
我用stable diffusion把真人转换成了手办(附模型)
最近我在研究如何将人物照片转换成手办照片,在这里记录下制作流程和注意事项,以便日后参考
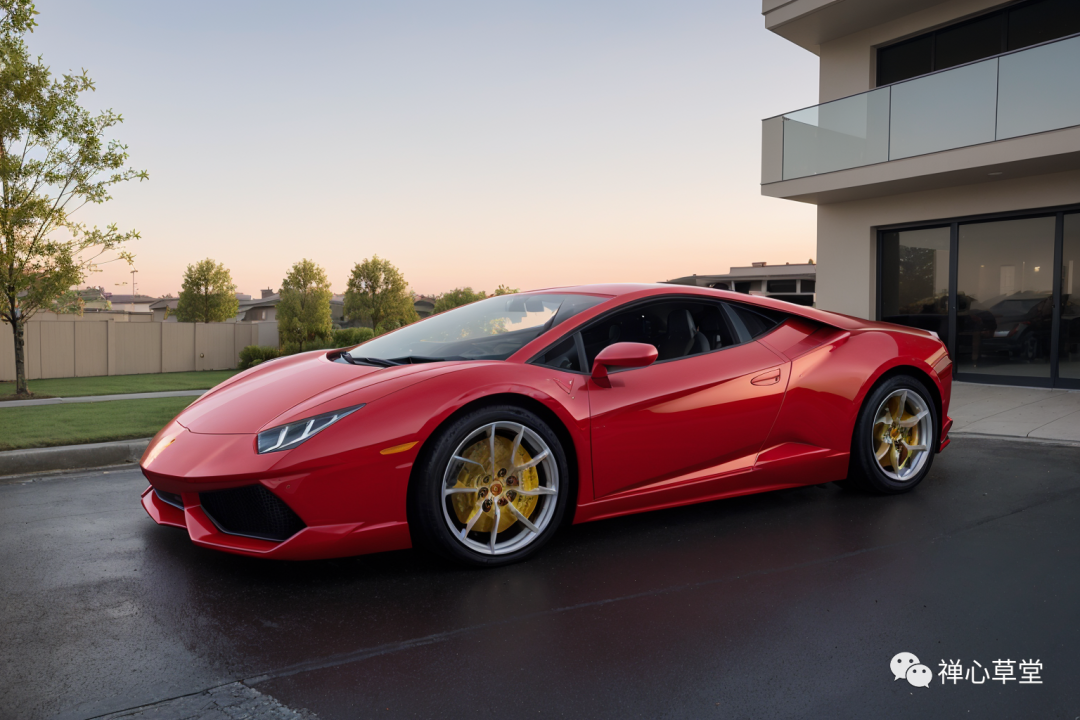
stablediffusion是一款非常强大的开源人工智能绘画软件,仅使用提示词就能做出很精美的图画。比如我让他画一辆清晨停在停车场的兰博基尼跑车,就得到了以下画面:
当然实际上并没有这么简单,想要让stablediffusion画出高质量的图片,需要设置的地方还有大模型,小模型,正面提示词,反面提示词,提示词强度,分辨率,迭代步数等等巨多的参数。
最近我在研究如何将人物照片转换成手办照片,在这里记录下制作流程和注意事项,以便日后参考。
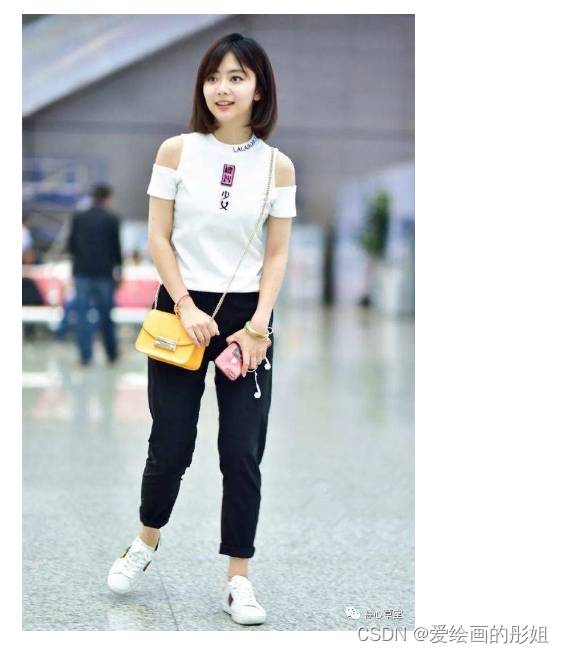
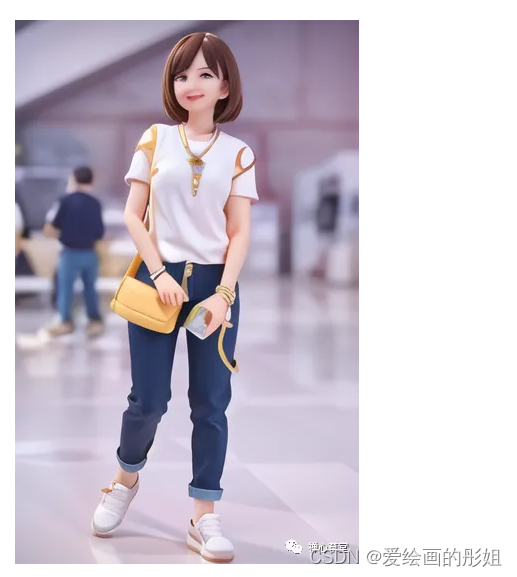
这次实验的目的是将下面这张人物照片转换成相似的手办照片。
1、将照片导入标签提取器,获得提示词,并手工筛选和调整。

2、因为要做卡通手办图,这里选择“disneyPixarCartoon_v10(1)”大模型。在AI绘图中,正确的选择大模型是很重要的。将提示词加入到文生图的正向提示词内,并补充画质和风格相关词语。并随着出图效果不断调整提示词内容,最终固定。最终的正面提示词如下:
“1girl, realistic, smile,[realistic],[3d],(3dcg), ((octane render)),
masterpiece, best quality, chibi,full body, pants, shirt, jewelry, photo
background,1 bag,1 phone,white shirt,solo, shoes,bracelet, blurry background,
full body,cellphone, smile, standing,holding, black pants,blurry, black hair,
realistic, handbag,white footwear, smartphone, sneakers, brown
hair,jeans,short hair,short sleeves, hold the phone in hand,in Exhibition
Hall,gray background, Background blurring, light smile, Pretty Asian Girl,
Both eyes open,”
负面提示词使用模版:
“ng_deepnegative_v1_75t,easynegative,bad_prompt_version2,deformed,missing
limbs,amputated,pants,shorts,cat ears,bad anatomy,naked,no
clothes,disfigured,poorly drawn
face,mutation,mutated,ugly,disgusting,blurry,watermark,watermarked,oversaturated,obese,doubled
face,b&w,black and white,sepia,nude,frekles,no masks, duplicate
image,blur,paintings, sketches, (worst quality:2), (low quality:2), (normal
quality:2), lowres, normal quality, monochrome, grayscale, bad
anatomy,(fat:1.2), facing away, looking away,tilted head,lowres,bad anatomy,
bad hands, text, error, missing fingers, extra digit, fewer digits, cropped,
worstquality, low quality,normal quality, jpegartifacts, signature, watermark,
username,blurry,bad feet,cropped,worst quality, low quality, normal
quality,jpeg artifacts,signature, watermark, bad eyes, red eyes, open
mouth,(Cock-eye,:1.1), With closed eyes,”
此时生成的图片是这样的:
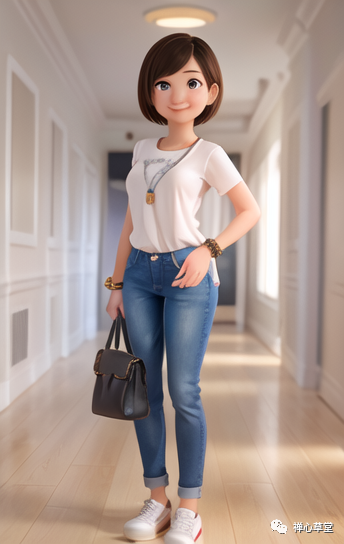
3、为了控制人物动作,将原图加入第一个controlnet,设置模型为openpose_full,选择向上设置分辨率,其他参数默认。看起来这样的动作就与原图很像了。
4、打开第二个controlnet并加入原图,设置模型为tile_resample,全部默认。这次就和原图更像了。

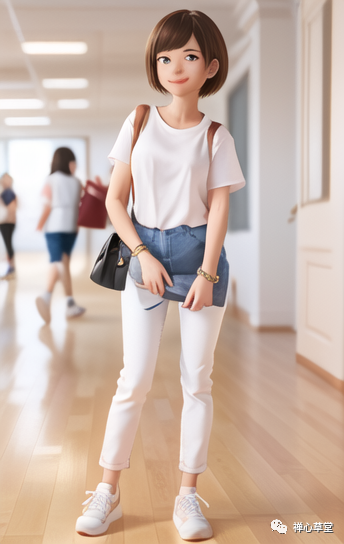
5、这里是关键一步,添加LORA模型:“blindbox_v1_mix”,权重选择1.25。现在生成的图片就比较像手办照片了。提示词里面也提前添加好了这个lora的唤醒咒语
“chibi,full body”。
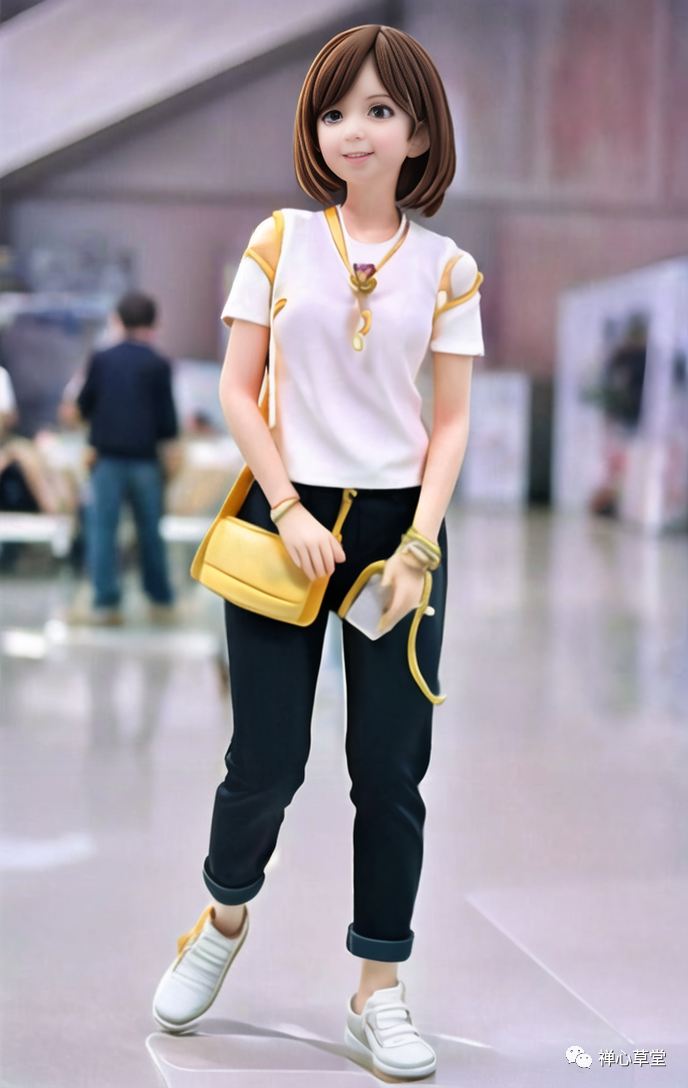
6、开始放大图片分辨率,增加细节。将上图发送至图生图,选择面部修复(前面文生图时忘选了),放大4倍,重绘幅度为0.35,脚本选择终极SD放大,放大算法是R+A,接缝修复类型是H+i。打开第一个controlnet并加入原图,设置模型为tile_resample,全部默认。打开第二个controlnet并加入原图,设置模型为reference_only,Style Fidelity设置为0.7,其他全部默认。最终效果见下图,脸的效果还可以,手还是有点崩了。后续再进一步完善吧。
本次绘图的过程中出现了几次报错,结尾部分的提示内容是“modules.devices.NansException: A tensor with all
NaNs was produced in VAE. This could be because there’s not enough precision
to represent the picture. Try adding --no-half-vae commandline argument to fix
this. Use --disable-nan-check commandline argument to disable this check.”
这个问题的发生原因有待研究,通过在正向提示词中添加–no-half-vae可临时解决此问题。
本次绘图使用的外挂VAE模型是“Counterfeit-V2.5.vae”
文章使用的AI绘画SD整合包、各种模型插件、提示词、AI人工智能学习资料都已经打包好放在网盘中了,无需自行查找,有需要的小伙伴文末扫码自行获取。


GitCode 天启AI是一款由 GitCode 团队打造的智能助手,基于先进的LLM(大语言模型)与多智能体 Agent 技术构建,致力于为用户提供高效、智能、多模态的创作与开发支持。它不仅支持自然语言对话,还具备处理文件、生成 PPT、撰写分析报告、开发 Web 应用等多项能力,真正做到“一句话,让 Al帮你完成复杂任务”。
更多推荐


 18
18 0
0- 0


 已为社区贡献34条内容

所有评论(0)