
RAGFlow核心引擎DeepDoc之PDF解析大起底
本文深入解析RAGFlow中的deepdoc模块,重点介绍了pdf文档解析器的实现细节。deepdoc包含parser(文档解析器)和vision(视觉处理)两大核心功能,其中pdf解析是最复杂的部分。文章详细剖析了PdfParser类的设计架构,包含PlainParser(基础文本提取)、RAGFlowPdfParser(核心处理流水线)和VisionParser(视觉扩展)三个类,它们通过统一
前面讲解了深度拆解RAGFlow分片引擎之切片实现 并没有深入的介绍deepdoc,我们今天来看下deepdoc。
综述
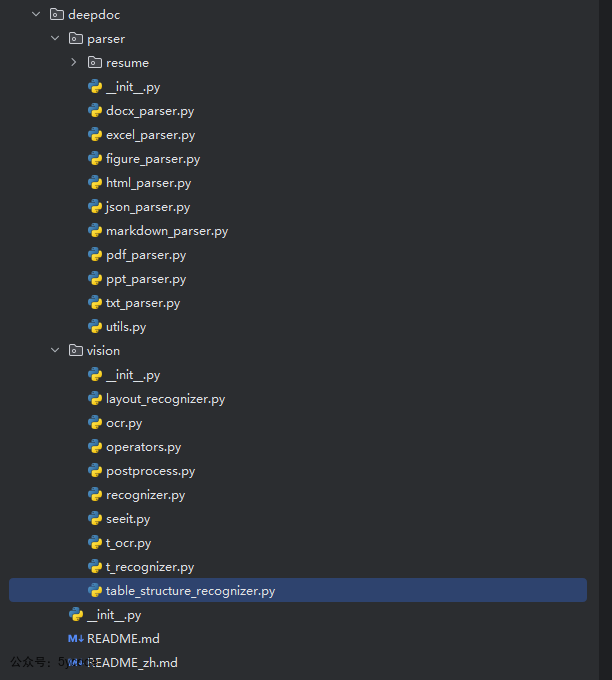
在deepdoc中主要有两个目录parser和vision。
parser是解析器,解析器是各种文档的解析实现,最复杂就是pdf的解析vision是视觉处理,主要包括OCR、布局识别、表结构识别
解析器在实现的过程中依赖视觉处理
pdf 文档解析器
在之前的切盼方法详解中。我们知道每个切片,只要涉及到pdf处理的,都有一段类似的代码
class Pdf(PdfParser):
    def __init__(self):

    def __call__(self, filename, binary=None, from_page=0,
                 to_page=100000, zoomin=3, callback=None, separate_tables_figures=False):
        start = timer()
        first_start = start
        callback(msg="OCR started")
        # ocr识别
        self.__images__(
            filename if not binary else binary,
            zoomin,
            from_page,
            to_page,
            callback
        )
        callback(msg="OCR finished ({:.2f}s)".format(timer() - start))
        start = timer()
        # 布局分析 识别标题/段落等层级
        self._layouts_rec(zoomin)
        callback(0.63, "Layout analysis ({:.2f}s)".format(timer() - start))

        start = timer()
        # 使用 transformer 进行表格检测与识别
        self._table_transformer_job(zoomin)
        callback(0.65, "Table analysis ({:.2f}s)".format(timer() - start))

        start = timer()
        self._text_merge()
        callback(0.67, "Text merged ({:.2f}s)".format(timer() - start))
        # 是否分离表格和图形
        if separate_tables_figures:
            tbls, figures = self._extract_table_figure(True, zoomin, True, True, True)
            self._concat_downward()
            logging.info("layouts cost: {}s".format(timer() - first_start))
            # 返回文本块+表格+图形
            return [(b["text"], self._line_tag(b, zoomin)) for b in self.boxes], tbls, figures
        else:
            tbls = self._extract_table_figure(True, zoomin, True, True)
            # self._naive_vertical_merge()
            self._concat_downward()
            # self._filter_forpages()
            logging.info("layouts cost: {}s".format(timer() - first_start))
            return [(b["text"], self._line_tag(b, zoomin)) for b in self.boxes], tbls
PdfParser指向的就是pdf解析器。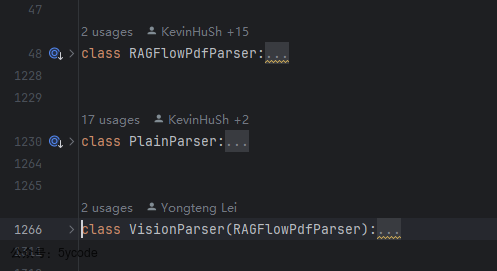
在pdf_parser.py文件中,总共有1000多行代码,有3个类。
PlainParser是轻量级工具类,仅提供最基础的文本提取RAGFlowPdfParser是核心处理器,包含完整的文档理解流水线VisionParser是功能扩展,在核心功能上增加视觉模型能力
虽然三个类的实现不同,但通过统一的
__call__方法返回相同格式:
初始化方法__init__
在这里把所有的资源进行了初始化。
def __init__(self, **kwargs):
    """
    If you have trouble downloading HuggingFace models, -_^ this might help!!
    For Linux:    export HF_ENDPOINT=https://hf-mirror.com
    For Windows:    Good luck    ^_-
    """
    # OCR引擎
    self.ocr = OCR()
    self.parallel_limiter = None
    # 计算gpu的数量,来推测并行数量
    if PARALLEL_DEVICES is not None and PARALLEL_DEVICES > 1:
        #  每个GPU独占1个工作槽位
        self.parallel_limiter = [trio.CapacityLimiter(1) for _ in range(PARALLEL_DEVICES)]
    # 动态模型选择
    if hasattr(self, "model_speciess"):
        self.layouter = LayoutRecognizer("layout." + self.model_speciess)
    else:
        self.layouter = LayoutRecognizer("layout")
    # 表格结构识别器
    self.tbl_det = TableStructureRecognizer()
    self.updown_cnt_mdl = xgb.Booster()
    # GPU加速优化
    if not settings.LIGHTEN:
        try:
            import torch.cuda
            if torch.cuda.is_available():
                self.updown_cnt_mdl.set_param({"device": "cuda"})
        except Exception:
            logging.exception("RAGFlowPdfParser __init__")
    # 双路径加载设计
    try:
        # 优先从本地加载
        model_dir = os.path.join(
            get_project_base_directory(),
            "rag/res/deepdoc")
        self.updown_cnt_mdl.load_model(os.path.join(
            model_dir, "updown_concat_xgb.model"))
    except Exception:
        # 失败时从HuggingFace下载
        model_dir = snapshot_download(
            repo_id="InfiniFlow/text_concat_xgb_v1.0",
            local_dir=os.path.join(get_project_base_directory(), "rag/res/deepdoc"),
            local_dir_use_symlinks=False)
        self.updown_cnt_mdl.load_model(os.path.join(
            model_dir, "updown_concat_xgb.model"))

    self.page_from = 0
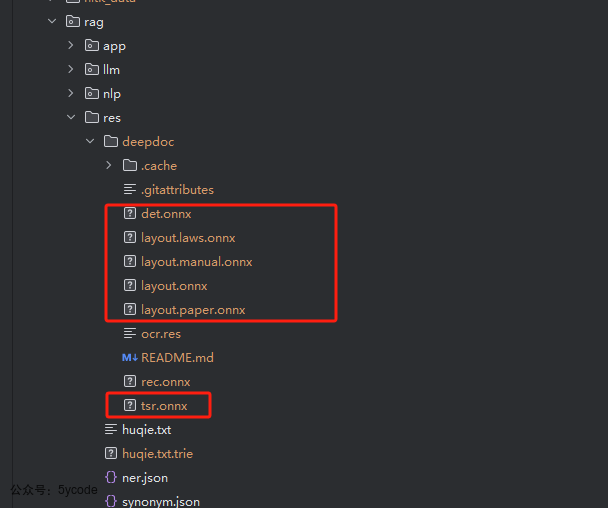
这些加载的资源大都在rag/res/deepdoc目录
这里有个bug,我觉的这个bug值199微信豆。我放到付费内容里。
魔术方法__call__实现
在RAGFlowPdfParser类中,有一个__call__方法的实现。我们在navie都是重写了该方法。
__call__是一个魔术方法(Magic Method),它允许类的实例像函数一样被“调用”。当你在一个实例后面加上括号()时,Python 会自动调用该实例的__call__方法。
def __call__(self, fnm, need_image=True, zoomin=3, return_html=False):
"""标准PDF解析流程(默认实现)
Args:
fnm: PDF文件路径
need_image: 是否保留图片区域(默认True)
zoomin: OCR分辨率放大系数(默认3倍)
return_html: 表格是否返回HTML格式(默认False)
Returns: Tuple[List[Dict], List[Dict]]: (文本块列表, 表格数据列表)
"""
# 加载PDF,转换为图像
self.__images__(fnm, zoomin)
# 版面布局后处理
self._layouts_rec(zoomin)
# table transformer模型
self._table_transformer_job(zoomin)
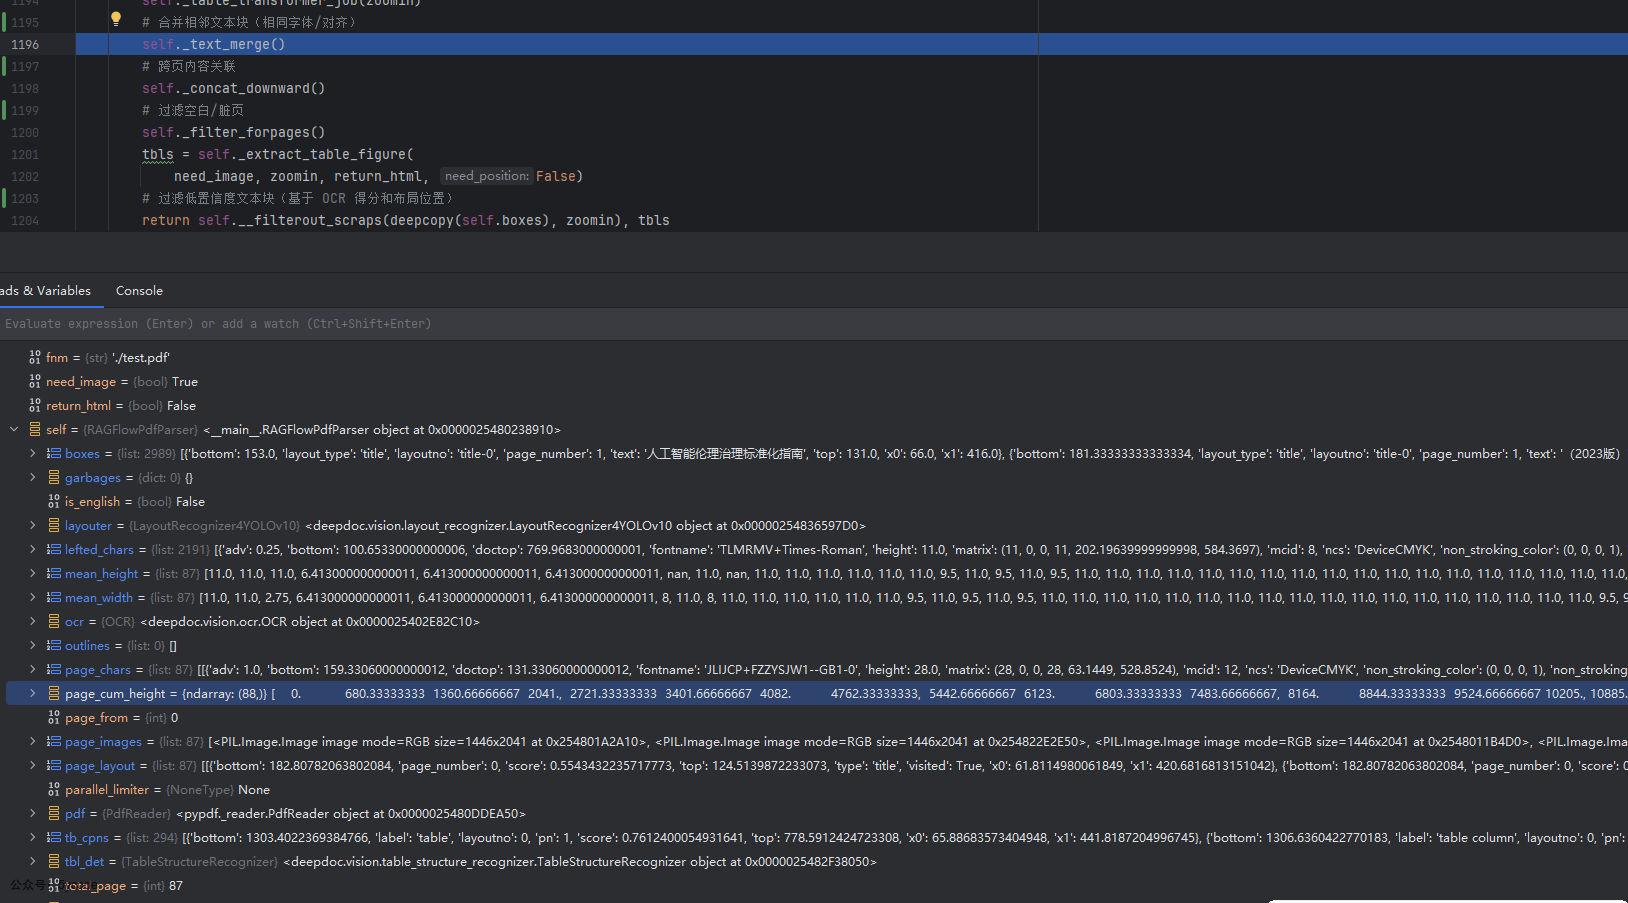
# 合并相邻文本块(相同字体/对齐)
self._text_merge()
# 跨页内容关联
self._concat_downward()
# 过滤空白/脏页
self._filter_forpages()
tbls = self._extract_table_figure(
need_image, zoomin, return_html, False)
# 过滤低置信度文本块(基于 OCR 得分和布局位置)
return self.__filterout_scraps(deepcopy(self.boxes), zoomin), tbls
__images__实现
我们看下__images__的流程。
文本提取相关的代码
# 使用模块属性锁,确保线程安全
with sys.modules[LOCK_KEY_pdfplumber]:
    # 使用pdfplumber打开 pdf文件或者文件流
    with (pdfplumber.open(fnm) if isinstance(fnm, str) else pdfplumber.open(BytesIO(fnm))) as pdf:
        self.pdf = pdf
        # 增强后的页面图像 分辨率增强(zoomin=3时达216DPI)
        self.page_images = [p.to_image(resolution=72 * zoomin).annotated for i, p in
                            enumerate(self.pdf.pages[page_from:page_to])]

        try:
            # 文本提取核心代码
            # 去重处理 dedupe_chars() 消除重叠字符
            # 颜色过滤 _has_color() 筛选有效字符(避免水印干扰)
            self.page_chars = [[c for c in page.dedupe_chars().chars if self._has_color(c)] for page in self.pdf.pages[page_from:page_to]]
        except Exception as e:
            logging.warning(f"Failed to extract characters for pages {page_from}-{page_to}: {str(e)}")
            self.page_chars = [[] for _ in range(page_to - page_from)]  # If failed to extract, using empty list instead.
        # 计算总页数
        self.total_page = len(self.pdf.pages)
- 通过dedupe_chars() 去重处理,消除重叠字符
- 通过_has_color() 颜色过滤,筛选有效字符,避免水印干扰
- 异常的时候,构建一个空的数组
大纲提取
# 大纲解析实现 文档大纲(标题+层级)
self.outlines = []
# 使用pypdf 读取pdf流
with (pdf2_read(fnm if isinstance(fnm, str)
				else BytesIO(fnm))) as pdf:
	self.pdf = pdf

	outlines = self.pdf.outline
	# 定义dfs方法
	def dfs(arr, depth):
		for a in arr:
			if isinstance(a, dict):
				self.outlines.append((a["/Title"], depth))
				continue
			dfs(a, depth + 1)

	# 递归遍历:dfs() 深度优先遍历PDF大纲树
	dfs(outlines, 0)
- 通过使用pypdf读取文件
- 通过递归遍历获取,PDF大纲
异步OCR处理
#异步OCR实现
async def __img_ocr(i, id, img, chars, limiter):
	if limiter:
	    async with limiter:
	        await trio.to_thread.run_sync(lambda: self.__ocr(i + 1, img, chars, zoomin, id))
	else:
	    self.__ocr(i + 1, img, chars, zoomin, id)
async def __img_ocr_launcher():
    def __ocr_preprocess():
        chars = self.page_chars[i] if not self.is_english else []
        self.mean_height.append(
            np.median(sorted([c["height"] for c in chars])) if chars else 0
        )
        self.mean_width.append(
            np.median(sorted([c["width"] for c in chars])) if chars else 8
        )
        self.page_cum_height.append(img.size[1] / zoomin)
        return chars
    # 控制GPU设备并行任务数
    if self.parallel_limiter:
        # 非阻塞IO调度
        async with trio.open_nursery() as nursery:
            for i, img in enumerate(self.page_images):
                chars = __ocr_preprocess()
                # 负载均衡到多个GPU
                nursery.start_soon(__img_ocr, i, i % PARALLEL_DEVICES, img, chars,
                                   self.parallel_limiter[i % PARALLEL_DEVICES])
                await trio.sleep(0.1)
    else:
        #单个gpu或没有gpu的处理逻辑
        for i, img in enumerate(self.page_images):
            chars = __ocr_preprocess()
            await __img_ocr(i, 0, img, chars, None)

start = timer()

trio.run(__img_ocr_launcher)
- 如果有多个GPU,分片不同的设备上
- 如果没有GPU或单个GPU,循环处理
所以解析pdf的时候,你没有GPU肯定慢的,不用想
root@a94bd6b4be23:apt install lshw
root@a94bd6b4be23:/ragflow/rag/res/deepdoc# lshw -C display
  *-display
       description: 3D controller
       product: Microsoft Corporation
       vendor: Microsoft Corporation
       physical id: 0
       bus info: pci@c9f3:00:00.0
       version: 00
       width: 32 bits
       clock: 33MHz
       capabilities: bus_master cap_list
       configuration: driver=dxgkrnl latency=0
       resources: irq:0
我是通过WSL2虚拟化方案使用的docker,是虚拟的GPU。
这里最后引入的__ocr
__ocr 方法处理
文本检测阶段
start = timer()
# 执行文本检测(返回格式:[(bbox_coords, text), ...])
bxs = self.ocr.detect(np.array(img), device_id)
logging.info(f"__ocr detecting boxes of a image cost ({timer() - start}s)")

start = timer()
if not bxs:
    self.boxes.append([])
    return
# 结果过滤与转换(保留有效文本框)
bxs = [(line[0], line[1][0]) for line in bxs]
# 按Y轴排序(使用当前页平均高度的1/3作为模糊阈值)
bxs = Recognizer.sort_Y_firstly(
    # 坐标归一化(除以缩放因子ZM)
    [{"x0": b[0][0] / ZM,  # 左边界
      "x1": b[1][0] / ZM,  # 右边界
      "top": b[0][1] / ZM, # 上边界
      "text": "", # 初始化文本内容
      "txt": t, # 原始检测文本(临时存储)
      "bottom": b[-1][1] / ZM,# 下边界
      "page_number": pagenum}
     for b, t in bxs if b[0][0] <= b[1][0] and b[0][1] <= b[-1][1]], # 坐标有效性校验
    self.mean_height[-1] / 3
)
字符融合
# 遍历排序后的字符数据(按Y轴排序,阈值=页平均高度/4)
for c in Recognizer.sort_Y_firstly(
        chars, self.mean_height[pagenum - 1] // 4):
    # 查找当前字符所属的文本框
    ii = Recognizer.find_overlapped(c, bxs)
    if ii is None:
        self.lefted_chars.append(c) # 无归属字符暂存
        continue
    # 高度差异校验(差异≥70%且非空格则视为异常字符)
    ch = c["bottom"] - c["top"]
    bh = bxs[ii]["bottom"] - bxs[ii]["top"]
    if abs(ch - bh) / max(ch, bh) >= 0.7 and c["text"] != ' ':
        self.lefted_chars.append(c)
        continue
    # 空格处理逻辑(前字符为数字/字母时保留空格)
    if c["text"] == " " and bxs[ii]["text"]:
        if re.match(r"[0-9a-zA-Zа-яА-Я,.?;:!%%]", bxs[ii]["text"][-1]):
            bxs[ii]["text"] += " "
    else:
        # 普通字符直接追加
        bxs[ii]["text"] += c["text"]
文本补全
boxes_to_reg = []
img_np = np.array(img)

# 筛选需补识别的空文本框
for b in bxs:
    if not b["text"]:
        # 还原缩放后坐标(ZM倍)
        left, right = b["x0"] * ZM, b["x1"] * ZM
        top, bottom = b["top"] * ZM, b["bottom"] * ZM

        # 提取文本框图像
        b["box_image"] = self.ocr.get_rotate_crop_image(
            img_np,
            np.array([[left, top], [right, top],
                     [right, bottom], [left, bottom]], dtype=np.float32)
        )
        boxes_to_reg.append(b)
    del b["txt"]  # 清理临时字段

# 批量识别空文本框
texts = self.ocr.recognize_batch([b["box_image"] for b in boxes_to_reg], device_id)

# 回填识别结果
for i in range(len(boxes_to_reg)):
    boxes_to_reg[i]["text"] = texts[i]
    del boxes_to_reg[i]["box_image"]  # 清理临时图像数据

# 过滤有效结果并更新页平均高度
bxs = [b for b in bxs if b["text"]]
if self.mean_height[-1] == 0:
    self.mean_height[-1] = np.median([b["bottom"] - b["top"] for b in bxs])
_layouts_rec
def _layouts_rec(self, ZM, drop=True):
    assert len(self.page_images) == len(self.boxes)
    self.boxes, self.page_layout = self.layouter(
        self.page_images, self.boxes, ZM, drop=drop)
    # cumlative Y
    for i in range(len(self.boxes)):
        self.boxes[i]["top"] += \
            self.page_cum_height[self.boxes[i]["page_number"] - 1]
        self.boxes[i]["bottom"] += \
            self.page_cum_height[self.boxes[i]["page_number"] - 1]
这块代码主要是
- 布局重新计算:通过
self.layouter对 OCR 识别结果(self.boxes)进行版面分析 - 跨页坐标归一化:将各页独立的坐标系转换为整个文档统一的坐标系(基于
page_cum_height)
_table_transformer_job
该方法的核心是 从文档页面中提取表格区域,并通过表格识别模型将表格结构转换为结构化数据,最终建立文本框与表格元素的关联关系。主要处理流程分为:
- 表格区域检测与裁剪
- 表格结构识别
- 坐标系统转换
- 表格元素与文本框关联
_text_merge
该方法的核心是 合并相邻的文本框,主要解决以下问题:
- 同一行文本被错误分割:OCR 或布局分析可能将连续文本拆分为多个框
- 中文排版特性处理:针对中文标点(如“,”、“(”)的上下文合并逻辑
- 非文本内容的保护:避免合并表格、图表、公式等特殊区域
_concat_downward
该方法实现 垂直方向的文本块合并,主要解决以下问题:
- 跨页文本连续性:处理分页导致的文本断裂(如表格跨页、段落跨页)
- 多行段落重组:将属于同一逻辑段落的分散文本块重新组合
- 智能合并决策:结合几何特征、文本特征和机器学习模型判断是否合并
_filter_forpages
该方法实现 基于页面内容的过滤机制,主要解决以下问题:
- 目录页识别与清除:检测并移除文档中的目录页及其关联内容
- 噪声页检测:通过特定符号(如"··")识别低质量页面
- 动态范围删除:根据上下文关系批量移除关联文本框
_extract_table_figure
该方法实现 文档中表格和图形的结构化提取,主要功能包括:
- 元素分类:识别表格(table)、图形(figure)及其标题(caption)
- 跨页合并:处理跨页连续的表格/图形
- 视觉还原:基于布局信息精确裁剪原始图像区域
- 多输出格式:支持HTML表格构造和原始图像导出
后记
- 这块代码逻辑有点烧脑,总的来说,就是想尽各种办法把内容提取到,然后解决提取到的内容的出现的各种问题
- 你得对文档结构以及对应的api,断点调试都不太好使
- 想深入学习,最好先看下pdf的操作的api
系列文章
dify相关
DeepSeek+dify 本地知识库:真的太香了
Deepseek+Dify本地知识库相关问题汇总
dify的sandbox机制,安全隔离限制
DeepSeek+dify 本地知识库:高级应用Agent+工作流
DeepSeek+dify知识库,查询数据库的两种方式(api+直连)
DeepSeek+dify 工作流应用,自然语言查询数据库信息并展示
聊聊dify权限验证的三种方案及实现
dify1.0.0版本升级及新功能预览
Dify 1.1.0史诗级更新!新增"灵魂功能"元数据,实测竟藏致命Bug?手把手教你避坑
【避坑血泪史】80次调试!我用Dify爬虫搭建个人知识库全记录
手撕Dify1.x插件报错!从配置到网络到Pip镜像,一条龙排雷实录
dify1.2.0升级,全新循环节点优化,长文写作案例
dify1.x无网环境安装插件
dify项目结构说明与win11本地部署
Dify 深度拆解(二):后端架构设计与启动流程全景图
dify应用:另类的关键词检索
ragflow相关
DeepSeek+ragflow构建企业知识库:突然觉的dify不香了(1)
DeepSeek+ragflow构建企业知识库之工作流,突然觉的dify又香了
DeepSeek+ragflow构建企业知识库:高级应用篇,越折腾越觉得ragflow好玩
RAGFlow爬虫组件使用及ragflow vs dify 组件设计对比
从8550秒到608秒!RAGFlow最新版本让知识图谱生成效率狂飙,终于不用通宵等结果了
以为发现的ragflow的宝藏接口,其实是一个天坑、Chrome/Selenium版本地狱
NLTK三重降噪内幕!RAGFlow检索强悍竟是靠这三板斧
从代码逆向RAGFlow架构:藏在18张表里的AI知识库设计哲学
解剖RAGFlow!全网最硬核源码架构解析
深度拆解RAGFlow分片引擎!3大阶段+视觉增强,全网最硬核架构解析
深度拆解RAGFlow分片引擎之切片实现
RAGFlow核心引擎DeepDoc之PDF解析大起底:黑客级PDF解析术与致命漏洞
RAGFlow 0.18.0 实战解读:从 MCP 支持到插件配置的全流程揭秘
ragflow 0.19.0 图文混排功能支持

GitCode 天启AI是一款由 GitCode 团队打造的智能助手,基于先进的LLM(大语言模型)与多智能体 Agent 技术构建,致力于为用户提供高效、智能、多模态的创作与开发支持。它不仅支持自然语言对话,还具备处理文件、生成 PPT、撰写分析报告、开发 Web 应用等多项能力,真正做到“一句话,让 Al帮你完成复杂任务”。
更多推荐


 22
22 0
0- 0


 已为社区贡献1条内容

所有评论(0)