
Tensorflow Lite(2) : 使用Model Maker 创建边缘端机器学习模型
在这篇文字中,将介绍如何使用TF Lite模型创建库创建TensorFlow Lite模型。我们将在自定义数据集上微调一个预训练的图像分类模型,并进一步探索Tensorflow Lite支持的不同类型的模型优化技术,并将其导出到TF Lite模型。将创建的TF Lite模型与通过Tensorflow Lite 转换的模型进行详细的性能比较,最后将模型部署到web应用中。1. TensorFlow
在这篇博文中,将介绍如何使用TF Lite model maker库创建TensorFlow Lite模型。我们将在自定义数据集上微调一个预训练的图像分类模型,并进一步探索Tensorflow Lite支持的不同类型的模型优化技术,并将其导出到TF Lite模型。将创建的TF Lite模型与通过Tensorflow Lite 转换的模型进行详细的性能比较,最后将模型部署到web应用中。
1. TensorFlow Lite Model Maker
TensorFlow Lite Model Maker库使我们能够在自定义数据集上训练一个预训练的或一个自定义的TensorFlow Lite模型。当为边缘设备的ML应用程序部署TensorFlow神经网络模型时,它简化了转换模型到特定输入数据的过程。目前,它支持ML任务,例如
- 图像分类
- 对象检测
- 文本分类
- BERT QA
- 音频分类
- 推荐系统
2.安装
有两种方法可以安装Model Maker 库。
- 使用pip
pip install tflite-model-maker
- 从GitHub克隆源代码:
git clone https://github.com/tensorflow/examples
cd examples/tensorflow_examples/lite/model_maker/pip_package
pip install -e .
3. 准备数据集
与上一个博客类似,我们将使用微软的猫和狗数据集。我们将使用wget命令下载数据集。我们将使用zipfile库保存下载的文件,并将其解压到dataset文件夹。
#Importing zipfile
import zipfile
#Downloading the Cats and Dogs Dataset from Microsoft Download
!wget --no-check-certificate \
    "https://download.microsoft.com/download/3/E/1/3E1C3F21-ECDB-4869-8368-6DEBA77B919F/kagglecatsanddogs_3367a.zip" \
    -O "/content/cats-and-dogs.zip"

#Saving zip file
local_zip = '/content/cats-and-dogs.zip'
zip_ref   = zipfile.ZipFile(local_zip, 'r')

#Extracting zip file
zip_ref.extractall('/content/')
zip_ref.close()
我们将使用image_classifier()模块中的DataLoader()函数来加载图像分类数据。由于数据存储在目录中,文件夹的名称是图像数据的标签,因此我们将使用DataLoader.from_folder()加载数据。但在此之前,我们必须将所有图像转换为.png格式,因为目前Dataloader()只支持png和jpeg格式的图像。我们将首先从数据集中删除两个损坏的图像文件。
#Removing corrupted images in the dataset
rm /content/PetImages/Cat/666.jpg
rm /content/PetImages/Dog/11702.jpg
#Importing libraries
from PIL import Image
import glob
import os
from pathlib import Path

#Converting images in cat folder to png format
current_dir = Path('/content/PetImages/Cat').resolve()
outputdir = Path('/content/Dataset').resolve()
out_dir = outputdir / "Cat"
os.mkdir(out_dir)
cnt = 0

for img in glob.glob(str(current_dir / "*.jpg")):
    filename = Path(img).stem
    Image.open(img).save(str(out_dir / f'{filename}.png'))
    cnt = cnt + 1
    print(cnt)

#Converting images in dog folder to png format
current_dir = Path('/content/PetImages/Dog/').resolve()
outputdir = Path('/content/Dataset/').resolve()
out_dir = outputdir / "Dog"
os.mkdir(out_dir)
cnt = 0

for img in glob.glob(str(current_dir / "*.jpg")):
    filename = Path(img).stem
    Image.open(img).convert('RGB').save(str(out_dir / f'{filename}.png'))
    cnt = cnt + 1
    print(cnt)
我们使用Dataloder.from_folder()函数加载数据集。
#Loading dataset using the Dataloader
data = DataLoader.from_folder('/content/Dataset')
INFO:tensorflow:Load image with size: 24998, num_label: 2, labels: Cat, Dog.
现在,我们将数据集按7:2:1的比例分别拆分为训练集、验证集和测试集。
#Splitting dataset into training, validation and testing data
train_data, rest_data = data.split(0.7)
validation_data, test_data = rest_data.split(0.67)
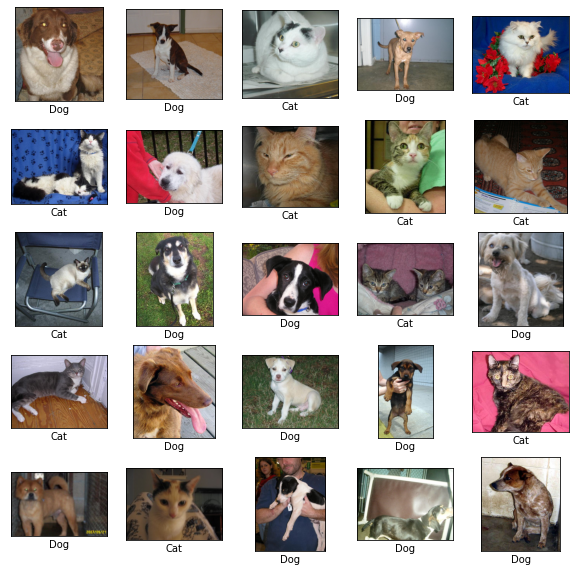
看一下数据集中的一些图像
#Visualizing images in the dataset
plt.figure(figsize=(10,10))
for i, (image, label) in enumerate(data.gen_dataset().unbatch().take(25)):
  plt.subplot(5,5,i+1)
  plt.xticks([])
  plt.yticks([])
  plt.grid(False)
  plt.imshow(image.numpy(), cmap=plt.cm.gray)
  plt.xlabel(data.index_to_label[label.numpy()])
plt.show()
4. 模型训练
我们将重新训练effecentnet Lite 0模型。它在Imagenet (ILSVRC-2012-CLS)上训练,针对TFLite进行优化,并针对移动CPU、GPU和EdgeTPU的性能进行设计。由于边缘设备的需求,对原有的EfficientNets做了以下改动:
- 移除了
squeeze-and-excite blocks(SE),因为SE在一些移动加速器中不能很好地支持。 - 用RELU6替换所有的swish,更容易后量化。
- 固定 stem 和head部分,同时压缩模型,以保持模型小和快速。
我们将使用image_classifier.create()函数创建模型。model_spec()帮助我们指定将使用model_spec.get()函数导入预先训练的图像分类模型。我们将分别传递train_data和validation_data作为训练数据集和验证数据集。此外,为了重新训练整个模型,我们已经将train_whole_model设置为true。根据需要在image_classifier.create()中添加其他参数。我们让其余的参数保持默认值。
#Training the model
model = image_classifier.create(train_data, model_spec=model_spec.get('efficientnet_lite0'), validation_data=validation_data, train_whole_model=True,)
INFO:tensorflow:Retraining the models...
INFO:tensorflow:Retraining the models...
Model: "sequential_1"
_________________________________________________________________
Layer (type)                Output Shape              Param #
=================================================================
hub_keras_layer_v1v2_1 (Hub  (None, 1280)             3413024
KerasLayerV1V2)

dropout_1 (Dropout)         (None, 1280)              0

dense_1 (Dense)             (None, 2)                 2562

=================================================================
Total params: 3,415,586
Trainable params: 2,562
Non-trainable params: 3,413,024
_________________________________________________________________
None
Epoch 1/5
/usr/local/lib/python3.7/dist-packages/keras/optimizer_v2/gradient_descent.py:102: UserWarning: The `lr` argument is deprecated, use `learning_rate` instead.
  super(SGD, self).__init__(name, **kwargs)
546/546 [==============================] - 2586s 5s/step - loss: 0.2463 - accuracy: 0.9812 - val_loss: 0.2281 - val_accuracy: 0.9899
Epoch 2/5
546/546 [==============================] - 151s 277ms/step - loss: 0.2299 - accuracy: 0.9898 - val_loss: 0.2266 - val_accuracy: 0.9900
Epoch 3/5
546/546 [==============================] - 151s 276ms/step - loss: 0.2271 - accuracy: 0.9908 - val_loss: 0.2258 - val_accuracy: 0.9906
Epoch 4/5
546/546 [==============================] - 153s 281ms/step - loss: 0.2264 - accuracy: 0.9916 - val_loss: 0.2243 - val_accuracy: 0.9902
Epoch 5/5
546/546 [==============================] - 153s 280ms/step - loss: 0.2258 - accuracy: 0.9909 - val_loss: 0.2259 - val_accuracy: 0.9904
现在让我们使用model.evaluate()函数在测试数据集上评估模型。
loss, accuracy = model.evaluate(test_data)
78/78 [==============================] - 341s 4s/step - loss: 0.2246 - accuracy: 0.9911
5. 模型优化
5.1 FP 16量化
可以使用model.export()函数将模型导出到Float-16 TF Lite模型。这里,我们将为Float 16定义量化配置。然后,我们将评估测试数据集上导出的量化模型。
#Defining Config
config = QuantizationConfig.for_float16()

#Exporting Model
model.export(export_dir='/content/Models/', tflite_filename='model_fp16.tflite', quantization_config=config)

#Evaluating Exported Model
model.evaluate_tflite('/content//Models/model_fp16.tflite', test_data)
{'accuracy': 0.9911111111111112}
5.2 Dynamic 量化
对于dynamic量化,我们将把量化配置设置为dynamic格式。其余过程与FP 16量化过程相同。
#Defining Config
config = QuantizationConfig.for_dynamic()
#Exporting Model
model.export(export_dir='/content/Models/', tflite_filename='model_dynamic.tflite', quantization_config=config)
#Evaluating Exported Model
model.evaluate_tflite('/content/Models/model_dynamic.tflite', test_data)
{'accuracy': 0.9919191919191919}
5.3 Integer 量化
与以前的量化类似,我们将整数量化的量化配置更改为整数格式。然后,我们将导出模型,并在测试数据集中对其进行评估。
#Defining Config
config = QuantizationConfig.for_int8(test_data)
#Exporting Model
model.export(export_dir='/content/Models/', tflite_filename='model_int8.tflite', quantization_config=config)
#Evaluating Exported Model
model.evaluate_tflite('/content/model_int8.tflite', test_data)
{'accuracy': 0.9915151515151515}
6. 创建和转换TF Lite模型的比较
在上一篇博客中,我们已经将微调过的模型转换为TF Lite。在这里,我们将比较转换后的TF Lite模型与本博客中创建的模型的性能。
6.1测试精度
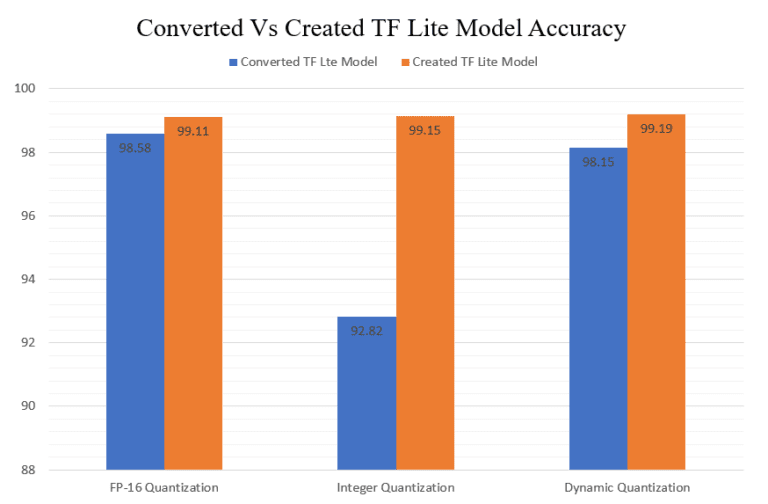
在创建的模型中可以看到,FP-16量化模型的准确性略有提高。但在整数量化模型的情况下,可以看到精度的显著性增加。
6.2模型的大小

我们可以清楚地看到,创建的TF Lite模型比转换的更轻。FP-16量化模型的模型大小差异最为显著。
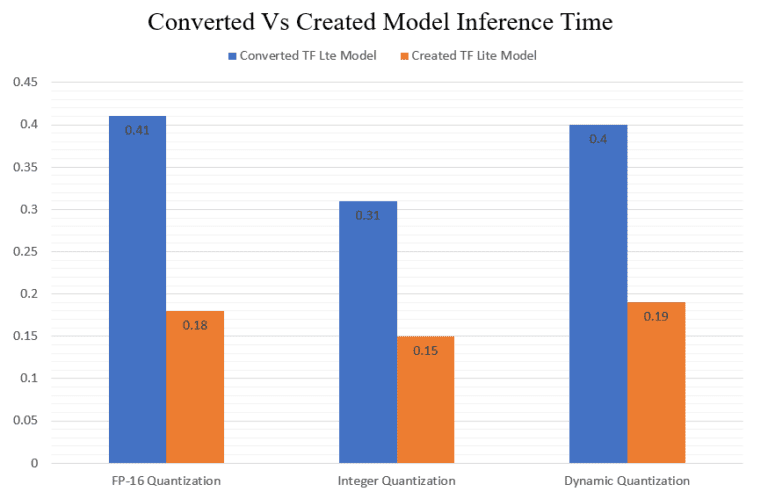
6.3推理时间
7. Streamlit部署
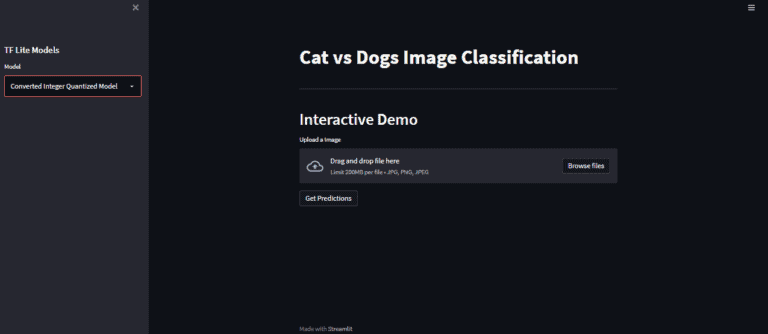
在之前的博客中,我们已经在边缘设备上部署了TF Lite模型。TF Lite 模型轻量化和快速的推理速度也使其适合部署在云上。现在让我们创建一个猫对狗图像分类器Web应用程序,我们将上传一张图像,我们的模型将推理这张图像是猫还是狗。Streamlit是一个开源应用程序框架,它允许我们用python开发和部署web应用程序。
我们将从导入所需的库和包开始。
# Importing Libraries and Packages
from PIL import Image
import streamlit as st
import tensorflow as tf
import time
import os
们定义将作为预期输出返回的类标签。
class_names = ["Cat", "Dog"]
定义一个函数来设置interpreter的输入张量。
def set_input_tensor(interpreter, image):
  """Sets the input tensor."""
  tensor_index = interpreter.get_input_details()[0]['index']
  input_tensor = interpreter.tensor(tensor_index)()[0]
  input_tensor[:, :] = image
现在,我们将定义函数get_forecasts(),它将接受一张图像作为输入并返回图像的预测类型。
def get_predictions(input_image):
    output_details = tflite_interpreter.get_output_details()
    set_input_tensor(tflite_interpreter, input_image)
    tflite_interpreter.invoke()
    tflite_model_prediction = tflite_interpreter.get_tensor(output_details[0]["index"])
    tflite_model_prediction = tflite_model_prediction.squeeze().argmax(axis = 0)
    pred_class = class_names[tflite_model_prediction]
    # print(tflite_model_prediction)
    # print(pred_class)
    return pred_class
现在,我们将定义web应用程序的一些元素,如标题、标题和侧边栏。
## Page Title
st.set_page_config(page_title = "Cats vs Dogs Image Classification")
st.title(" Cat vs Dogs Image Classification")
st.markdown("---")
现在我们将创建工具条,以便用户可以选择任何已创建和转换的TF Lite模型。
## Sidebar
st.sidebar.header("TF Lite Models")
display = ("Select a Model","Converted FP-16 Quantized Model", "Converted Integer Quantized Model", "Converted Dynamic Range Quantized Model","Created FP-16 Quantized Model", "Created Quantized Model", "Created Dynamic Range Quantized Model")
options = list(range(len(display)))
value = st.sidebar.selectbox("Model", options, format_func=lambda x: display[x])
print(value)
根据所选择的模型,我们必须相应地设置模型的路径。
if value == 1:
    tflite_interpreter = tf.lite.Interpreter(model_path='models\converted_fp_16_model.tflite')
if value == 2:
    tflite_interpreter = tf.lite.Interpreter(model_path='models\converted_int_quant_model.tflite')
if value == 3:
    tflite_interpreter = tf.lite.Interpreter(model_path='models\converted_dynamic_quant_model.tflite')
if value == 4:
    tflite_interpreter = tf.lite.Interpreter(model_path='models\created_model_fp16.tflite')

if value == 5:
    tflite_interpreter = tf.lite.Interpreter(model_path='models\created_model_int8.tflite')

if value == 6:
    tflite_interpreter = tf.lite.Interpreter(model_path='models\created_model_dynamic.tflite')
现在让我们定义一个函数,该函数允许上传图片文件并将其保存到临时目录,以便模型进行推理。在这里,如果选择的模型是整数量化的,我们将必须确保上传的图像转换为uint8格式。
## Input Fields
uploaded_file = st.file_uploader("Upload a Image", type=["jpg","png", 'jpeg'])
if uploaded_file is not None:
    with open(os.path.join("tempDir",uploaded_file.name),"wb") as f:
         f.write(uploaded_file.getbuffer())
    path = os.path.join("tempDir",uploaded_file.name)
    img = tf.keras.preprocessing.image.load_img(path , grayscale=False, color_mode='rgb', target_size=(224,224,3), interpolation='nearest')
    st.image(img)
    print(value)
    if value == 2 or value == 5:
        img = tf.image.convert_image_dtype(img, tf.uint8)
    img_array = tf.keras.preprocessing.image.img_to_array(img)
    img_array = tf.expand_dims(img_array, 0)
我们创建一个预测按钮
if st.button("Get Predictions"):
    suggestion = get_predictions(input_image =img_array)
    st.success(suggestion)
完整的app.py
# Imports
import streamlit as st
import tensorflow as tf
import os
import numpy as np
class_names = ["Cat", "Dog"]

## Page Title
st.set_page_config(page_title = "Cats vs Dogs Image Classification")
st.title(" Cat vs Dogs Image Classification")
st.markdown("---")

## Sidebar
st.sidebar.header("TF Lite Models")
display = ("Select a Model","Converted FP-16 Quantized Model", "Converted Integer Quantized Model", "Converted Dynamic Range Quantized Model","Created FP-16 Quantized Model", "Created Quantized Model", "Created Dynamic Range Quantized Model")
options = list(range(len(display)))
value = st.sidebar.selectbox("Model", options, format_func=lambda x: display[x])
print(value)

if value == 1:
    tflite_interpreter = tf.lite.Interpreter(model_path='models\converted_fp_16_model.tflite')
    tflite_interpreter.allocate_tensors()
if value == 2:
    tflite_interpreter = tf.lite.Interpreter(model_path='models\converted_int_quant_model.tflite')
    tflite_interpreter.allocate_tensors()
if value == 3:
    tflite_interpreter = tf.lite.Interpreter(model_path='models\converted_dynamic_quant_model.tflite')
    tflite_interpreter.allocate_tensors()
if value == 4:
    tflite_interpreter = tf.lite.Interpreter(model_path='models\created_model_fp16.tflite')
    tflite_interpreter.allocate_tensors()
if value == 5:
    tflite_interpreter = tf.lite.Interpreter(model_path='models\created_model_int8.tflite')
    tflite_interpreter.allocate_tensors()
if value == 6:
    tflite_interpreter = tf.lite.Interpreter(model_path='models\created_model_dynamic.tflite')
    tflite_interpreter.allocate_tensors()

def set_input_tensor(interpreter, image):
  """Sets the input tensor."""
  tensor_index = interpreter.get_input_details()[0]['index']
  input_tensor = interpreter.tensor(tensor_index)()[0]
  input_tensor[:, :] = image

def get_predictions(input_image):
    output_details = tflite_interpreter.get_output_details()
    set_input_tensor(tflite_interpreter, input_image)
    tflite_interpreter.invoke()
    tflite_model_prediction = tflite_interpreter.get_tensor(output_details[0]["index"])
    tflite_model_prediction = tflite_model_prediction.squeeze().argmax(axis = 0)
    pred_class = class_names[tflite_model_prediction]
    return pred_class


## Input Fields
uploaded_file = st.file_uploader("Upload a Image", type=["jpg","png", 'jpeg'])
if uploaded_file is not None:
    with open(os.path.join("tempDir",uploaded_file.name),"wb") as f:
        f.write(uploaded_file.getbuffer())
    path = os.path.join("tempDir",uploaded_file.name)
    img = tf.keras.preprocessing.image.load_img(path , grayscale=False, color_mode='rgb', target_size=(224,224,3), interpolation='nearest')
    st.image(img)
    print(value)
    if value == 2 or value == 5:
        img = tf.image.convert_image_dtype(img, tf.uint8)
    img_array = tf.keras.preprocessing.image.img_to_array(img)
    img_array = tf.expand_dims(img_array, 0)


if st.button("Get Predictions"):
    suggestion = get_predictions(input_image =img_array)
    st.success(suggestion)
需要安装一些包,使得应用运行起来, 安装包的requirements.txt文件如下:
streamlit
tensorflow-cpu
opencv-python
我们将把这个图片和TF Lite模型上传到github仓库
现在我们准备在 streamlit share上部署我们的应用程序。我们只需在github库中指定app.py的url。
我们只需点击部署!应用程序就可以完成部署!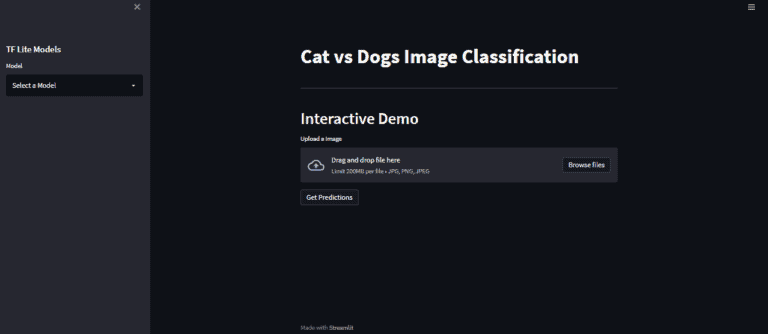
选择一个模型,比如说转换的整数量化模型。
上传一张图片: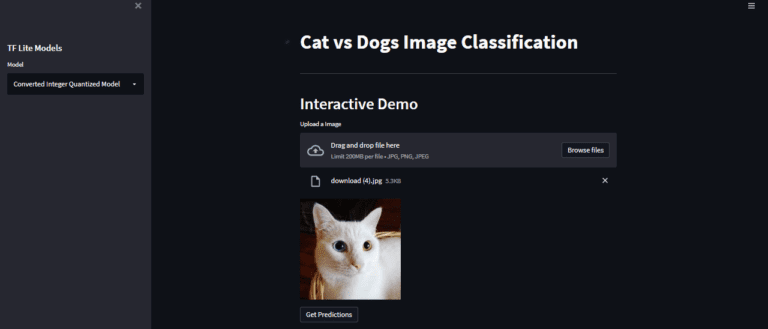
通过点击get forecasts按钮来获取模型预测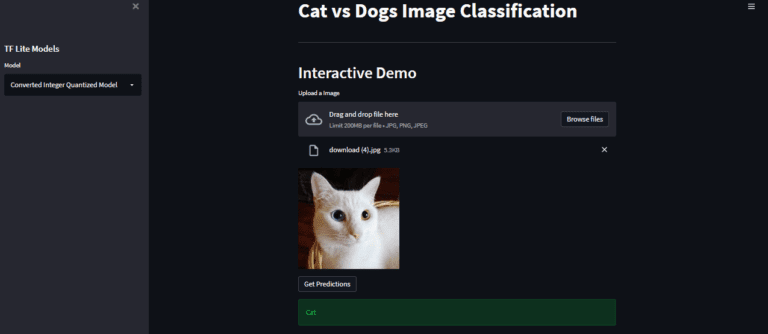
正如我们在这里看到的,我们已经成功地部署了应用程序,并能够从模型中进行推理。
源码下载

GitCode 天启AI是一款由 GitCode 团队打造的智能助手,基于先进的LLM(大语言模型)与多智能体 Agent 技术构建,致力于为用户提供高效、智能、多模态的创作与开发支持。它不仅支持自然语言对话,还具备处理文件、生成 PPT、撰写分析报告、开发 Web 应用等多项能力,真正做到“一句话,让 Al帮你完成复杂任务”。
更多推荐


 1
1 0
0- 0


 已为社区贡献7条内容

所有评论(0)