
python可视化执行幻影坦克
from tkinter import *#导入tkinterfrom tkinter.filedialog import *import tkinter.messageboxdef main():def maxImageFile():maxFilePath = askopenfilename()entry01.delete(0, END)# 将输入框里面的内容清空entry01.insert(0
·
from tkinter import *#导入tkinter
from tkinter.filedialog import *
import sys #sys模块包含了与Python解释器和它的环境有关的函数
from PIL import Image #PIL:Python Imaging Library,已经是Python平台事实上的图像处理标准库了
# 主函数
def main():
# 绑定第一个按钮选择大图片 得到大图片的文件的绝对路径
def maxImageFile():
maxFilePath = askopenfilename()
entry01.delete(0, END) # 将输入框里面的内容清空
entry01.insert(0, maxFilePath)
# 绑定第二个按钮选择小图片 得到小图片的文件的绝对路径
def smallImageFile():
smallFilePath = askopenfilename()
entry02.delete(0, END) # 将输入框里面的内容清空
entry02.insert(0, smallFilePath)
# 绑定第4个转换按钮 得到新图片的名字 并且执行剩余函数
def getFileName():
# 把输入的大图片,小图片,新存为的图片的字符串拿到
BigImg=entryPath1.get()#大图片的绝对路径 赋值于变量
BigImgStr=BigImg.split("/")
BigImgStr1 =BigImgStr[0:-1]#得到大图片的所在路径文件夹(目前得到的是列表数据格式)
BigImgStr2 ="/"
BigImgPath=BigImgStr2.join(BigImgStr1)
# BigImgPath 为字符串数据格式
SmallImg=entryPath2.get()
NewImg=newFileName.get()
# 执行转换函数
imageChange(BigImg,SmallImg,NewImg,BigImgPath)
# 图片转换函数
# 三个参数大,小,新图片的名字
def imageChange(BigImg,SmallImg,NewImg,BigImgPath):
# 先打开图片文件
bigImg =Image.open(BigImg)
smallImg = Image.open(SmallImg)
# 得到两张图片的像素尺寸
bigImgWidth,bigImgHeight=bigImg.size
smallImgWidth,smallImgHeight=smallImg.size
# 新图片的数据(这里主要得到像素尺寸)
newImg = bigImg.copy()
# 得到比例 宽高
stepx, stepy= bigImgWidth/smallImgWidth, bigImgHeight/smallImgHeight
for i in range(0,smallImgWidth):#图片数据行循环
for j in range(0,smallImgHeight):#图片数据列循环
newImgX=int(i*stepx+stepx*0.5)
newImgY=int(j*stepy+stepy*0.5)
if newImgX<bigImgWidth and newImgY<bigImgHeight:
newImg.putpixel((newImgX,newImgY),smallImg.getpixel((i,j)))
newImg.save("{a}/{b}".format(a=BigImgPath,b=NewImg))#新图片文件保存位置以及名字
bigImg.close()#关闭文件
smallImg.close()#关闭文件
newImg.close()#关闭文件
window = Tk()#创建Tk实例,也就是要显示的窗口
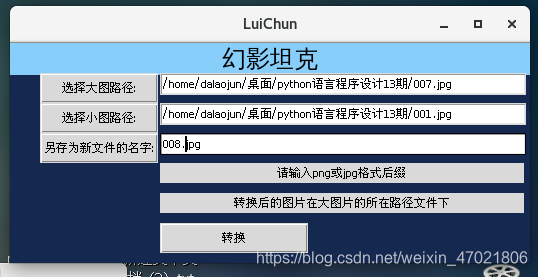
window.title("LuiChun")#窗口标题
window["background"]="#152950"#窗口背景颜色
window.geometry("520x220+30+30")#窗口大小以及距离屏幕桌上角的坐标
Label(window,bg="#87CEFA",width=30,font=("Arial",18),text="幻影坦克").pack(fill=X)
entryPath1 = StringVar()
entryPath2 = StringVar()
newFileName = StringVar()
button1= Button(window,text="选择大图路径:",width=15,command=maxImageFile)
button2= Button(window,text="选择小图路径:",width=15,command=smallImageFile)
button3=Button(window,text="另存为新文件的名字:",width=15)
button4=Button(window,text="转换",width=20,command=getFileName)
entry01 =Entry(window,width=60,textvariable=entryPath1)
entry02 =Entry(window,width=60,textvariable=entryPath2)
entry03 =Entry(window,width=60,textvariable=newFileName)#输入的新图片名字绑定变量
label2 = Label(window,width=60,text="请输入png或jpg格式后缀")
label3 = Label(window,width=60,text="转换后的图片在大图片的所在路径文件下")
# 一级布局
label2.pack(fill=X)
label3.pack(fill=X)
button1.pack()
button2.pack()
button3.pack()
button4.pack()
entry01.pack()
entry02.pack()
entry03.pack()
# 二级布局设计坐标
button1.place(x=30,y=30)
button2.place(x=30,y=60)
button3.place(x=30,y=90)
label2.place(x=150,y=120)
label3.place(x=150,y=150)
button4.place(x=150,y=180)
entry01.place(x=150,y=30)
entry02.place(x=150,y=60)
entry03.place(x=150,y=90)
mainloop()
if __name__=="__main__":
main()
# 请多多指教大佬。
# https://blog.csdn.net/weixin_47021806/article/details/115311291

GitCode 天启AI是一款由 GitCode 团队打造的智能助手,基于先进的LLM(大语言模型)与多智能体 Agent 技术构建,致力于为用户提供高效、智能、多模态的创作与开发支持。它不仅支持自然语言对话,还具备处理文件、生成 PPT、撰写分析报告、开发 Web 应用等多项能力,真正做到“一句话,让 Al帮你完成复杂任务”。
更多推荐


 0
0 0
0- 0


 已为社区贡献3条内容

所有评论(0)