Java、Python、NodeJS等开发环境安装及配置镜像加速到国内源
本文详细介绍了在Windows和Linux系统上安装和配置Java、Python、NodeJS等开发环境的步骤。对于Java,推荐下载8/11/17版本,并提供了scoop和apt两种安装方式,支持版本切换和验证。Python部分介绍了scoop、apt和uv三种安装方式,并提供了版本切换和依赖管理的详细操作。NodeJS部分推荐使用nvm进行安装和版本管理。此外,文章还提供了配置国内源的方法,包
Java
从图中可以看出,下载8/11/17三个版本即可,其他版本按需下载。
从图中可以看出,除了Oracle外,Amazon和Eclipse Adoptium都挺好。
来源:https://newrelic.com/resources/report/2024-state-of-the-java-ecosystem
1.Windows
1.1 scoop方式安装JDK
scoop install corretto8-jdk corretto11-jdk corretto17-jdk corretto21-jdk
2.Linux
2.1 apt方式安装JDK
apt install software-properties-common -y
apt install openjdk-8-jdk openjdk-11-jdk openjdk-17-jdk openjdk-21-jdk -y
2.1.1 切换JDK
update-alternatives --config java
2.1.2 验证版本
java -version
2.1.3 原理
# 入口: /usr/bin/java -> /etc/alternatives/java*
ll /usr/bin/java

# 切换: /etc/alternatives/java -> /usr/lib/jvm/java-21-openjdk-amd64/bin/java*
ll /etc/alternatives/java

# 版本目录:/usr/lib/jvm
ll /usr/lib/jvm
Python
1.Windows
1.1 scoop方式安装Python
scoop install python38 python39 python310 python311 python312 python313 python314
1.2 uv方式安装Python(推荐)
scoop install uv
2.Linux
2.1 apt方式安装Python
apt install software-properties-common -y
add-apt-repository ppa:deadsnakes/ppa
apt install python{3.7,3.8,3.9,3.10,3.11,3.12,3.13,3.14} -y
2.1.1 配置版本切换
update-alternatives --install /usr/bin/python python /usr/bin/python2.7 1
update-alternatives --install /usr/bin/python python /usr/bin/python3.7 2
update-alternatives --install /usr/bin/python python /usr/bin/python3.8 3
update-alternatives --install /usr/bin/python python /usr/bin/python3.9 4
update-alternatives --install /usr/bin/python python /usr/bin/python3.10 5
update-alternatives --install /usr/bin/python python /usr/bin/python3.11 6
update-alternatives --install /usr/bin/python python /usr/bin/python3.12 7
update-alternatives --install /usr/bin/python python /usr/bin/python3.13 8
update-alternatives --install /usr/bin/python python /usr/bin/python3.14 9
2.1.2 切换Python
update-alternatives --config python
2.1.3 验证版本
python --version
2.2 uv方式安装Python(推荐)
curl -LsSf https://astral.sh/uv/install.sh | sh
或
wget -qO- https://astral.sh/uv/install.sh | sh
来源:https://docs.astral.sh/uv/getting-started/installation/
3.uv方式说明
uv python install python3.7 python3.8 python3.9 python3.10 python3.11 python3.12 python3.13 python3.14
3.1 查看版本列表
uv python list
3.2 初始化项目
uv init
3.3 添加依赖
uv add requests
3.4 查看依赖
uv tree
3.5 同步依赖
uv sync
NodeJS
1.Windows
1.1 scoop方式安装NodeJS
scoop install nodejs16 nodejs17 nodejs18 nodejs19 nodejs20 nodejs21 nodejs22 nodejs23
1.2 nvm方式安装NodeJS(推荐)
scoop install nvm
2.Linux
2.1 nvm方式安装NodeJS(推荐)
curl -o- https://raw.githubusercontent.com/nvm-sh/nvm/v0.40.3/install.sh | bash
或
wget -qO- https://raw.githubusercontent.com/nvm-sh/nvm/v0.40.3/install.sh | bash
来源:https://github.com/nvm-sh/nvm?tab=readme-ov-file#install–update-script
3.nvm方式说明
3.1 安装版本
nvm install 23
nvm install 22
nvm install 21
nvm install 20
nvm install 19
nvm install 18
nvm install 17
nvm install 16
3.2 查看版本列表
nvm list
3.3 切换版本
nvm use 23
3.4 验证版本
node -v
配置国内源
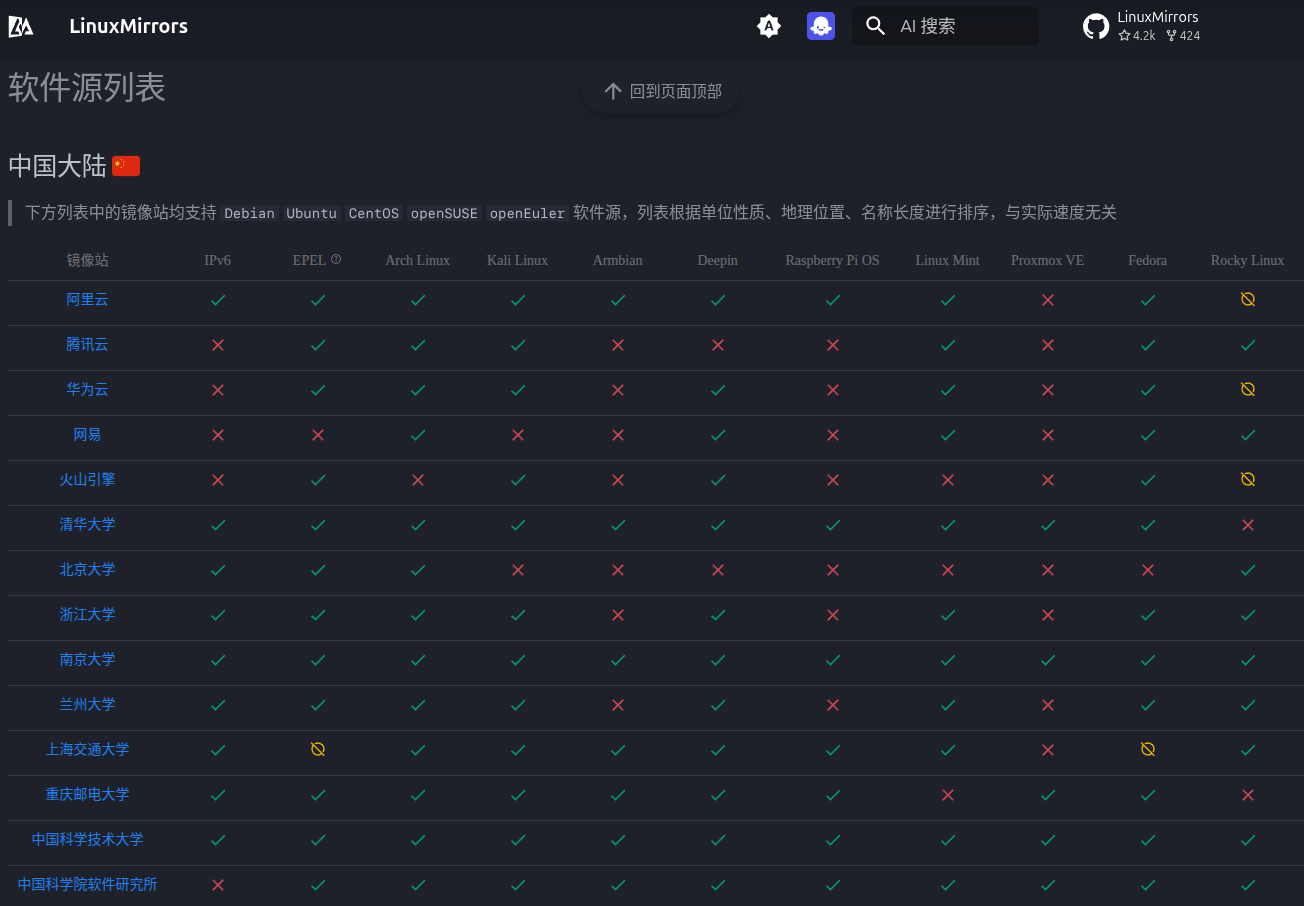
1.linuxmirrors
bash <(curl -sSL https://linuxmirrors.cn/main.sh)
2.pip国内源
-
清华贼快(推荐)
https://mirrors.tuna.tsinghua.edu.cn/help/pypi/ -
腾讯(备用)
https://mirrors.cloud.tencent.com/pypi/simple/ -
阿里贼慢还缺包
https://developer.aliyun.com/mirror/pypi -
豆瓣重定向到腾讯
https://pypi.doubanio.com/simple/
python -m pip install -i https://mirrors.tuna.tsinghua.edu.cn/pypi/web/simple --upgrade pip

pip config set global.index-url https://mirrors.cloud.tencent.com/pypi/simple/
pip config set global.extra-index-url "https://mirrors.cloud.tencent.com/pypi/simple/ https://mirrors.aliyun.com/pypi/simple"
# 阿里有时候缺包
(venv) d@d:~/SourceCode/test-gpu$ pip3 install torch torchvision torchaudio --index-url https://developer.aliyun.com/mirror/pypi
Looking in indexes: https://developer.aliyun.com/mirror/pypi
ERROR: Could not find a version that satisfies the requirement torch (from versions: none)
ERROR: No matching distribution found for torch

# 豆瓣重定向到腾讯了
(venv) d@d:~/SourceCode/test-gpu$ pip3 install torch torchvision torchaudio --index-url https://pypi.doubanio.com/simple/
Looking in indexes: https://pypi.doubanio.com/simple/
Collecting torch
  Downloading https://mirrors.cloud.tencent.com/pypi/packages/d1/35/e8b2daf02ce933e4518e6f5682c72fd0ed66c15910ea1fb4168f442b71c4/torch-2.5.1-cp311-cp311-manylinux1_x86_64.whl (906.5 MB)
3.maven和gradle国内源
参考:https://developer.aliyun.com/mvn/guide
.m2/settings.xml
<mirrors>
  <mirror>
    <id>aliyunmaven</id>
    <mirrorOf>central</mirrorOf>
    <name>阿里云公共仓库</name>
    <url>https://maven.aliyun.com/repository/public</url>
  </mirror>
  <mirror>
    <id>pentaho-public</id>
    <name>Pentaho Public</name>
    <mirrorOf>*</mirrorOf>
    <url>http://nexus.pentaho.org/content/groups/omni/</url>
  </mirror>
</mirrors>
\init.d\init.gradle
allprojects {
    repositories {
        mavenLocal()
        maven { name "Alibaba" ; url "https://maven.aliyun.com/repository/public" }
        mavenCentral()
    }

    buildscript {
        repositories {
            maven { name "Alibaba" ; url 'https://maven.aliyun.com/repository/public' }
        }
    }
}
4.npm
npm config set registry https://registry.npm.taobao.org
npm update
5.apt国内源(backup)
#--quiet
#-O file
wget -qO- https://gitee.com/duhongming/shell-script/raw/master/mirrors/apt-sources.sh | bash

GitCode 天启AI是一款由 GitCode 团队打造的智能助手,基于先进的LLM(大语言模型)与多智能体 Agent 技术构建,致力于为用户提供高效、智能、多模态的创作与开发支持。它不仅支持自然语言对话,还具备处理文件、生成 PPT、撰写分析报告、开发 Web 应用等多项能力,真正做到“一句话,让 Al帮你完成复杂任务”。
更多推荐
 已为社区贡献1条内容


所有评论(0)