
GNU Radio自定义模块:Embedded Python Block的使用
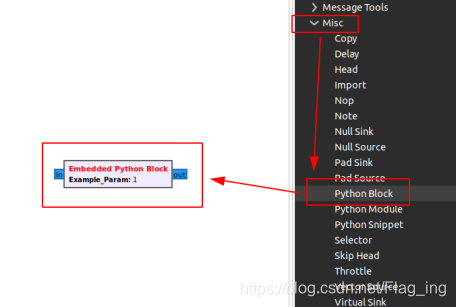
Embedded Python Block模块是gnu radio中的一个用Python定义的自定义块,可以使用Python来编程实现一些简单的功能。位置:Misc->Python Block
GNU Radio 学习使用 OOT 系列教程:
GNU Radio3.8创建OOT的详细过程(基础/C++)
GNU Radio3.8创建OOT的详细过程(进阶/C++)
GNU Radio3.8创建OOT的详细过程(python)
GNU Radio自定义模块:Embedded Python Block的使用
----------------------------------------------------------------------------------------
目录
1、简介
Embedded Python Block模块是gnu radio中的一个用Python实现的自定义功能块,可以使用Python来编程实现一些简单的功能。下面简单介绍下他的用法~
位置:Misc->Python Block
2、使用方式
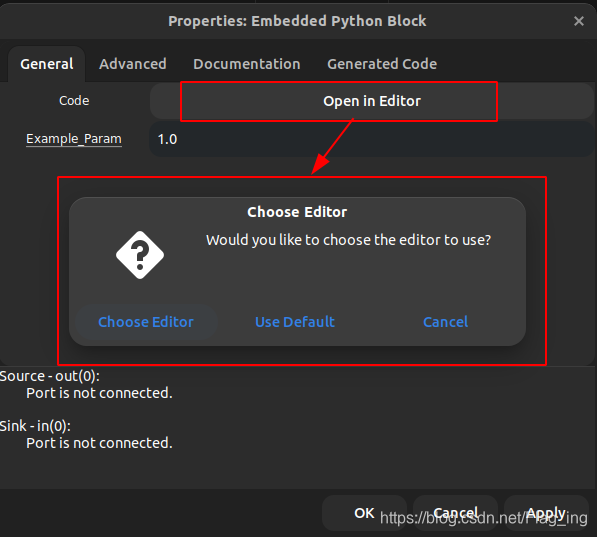
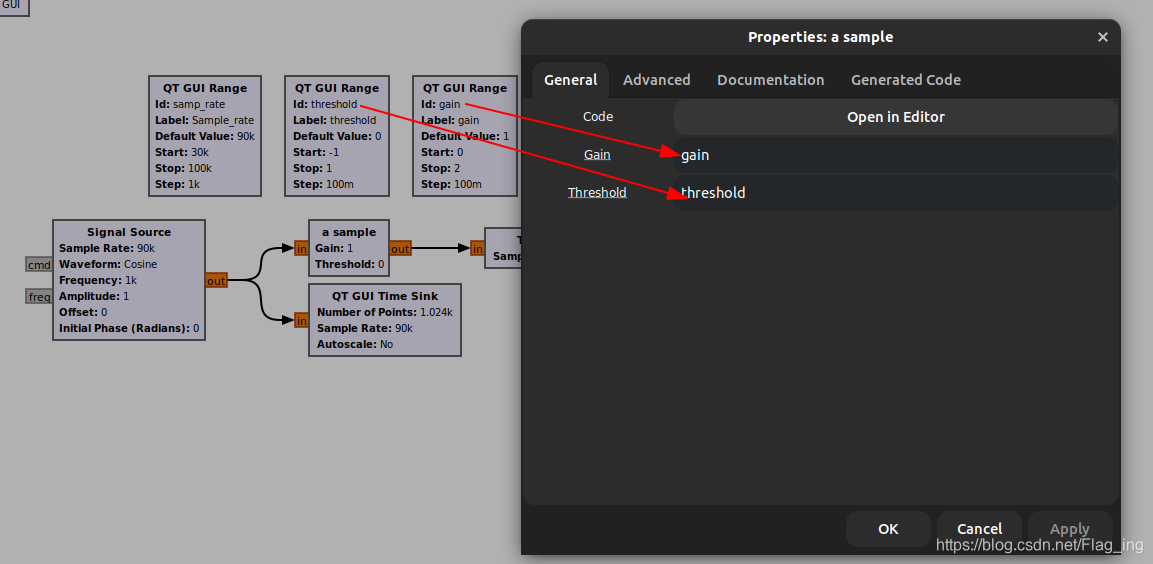
双击拖出来的Embedded Python Block模块,点击General->Code中的 open in editor,如下图所示,可以自定义选择使用的Python编辑器,也可以使用默认的编辑器。
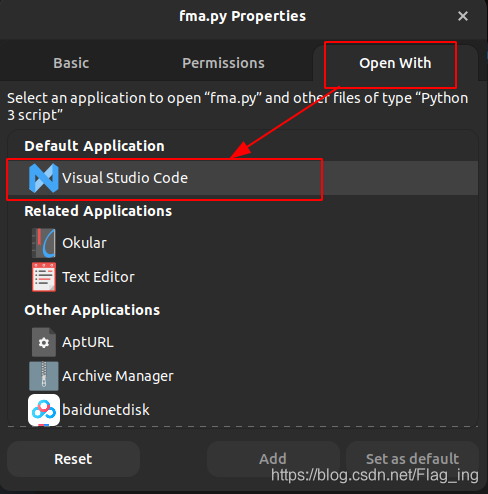
如果是自定义选择编辑器可能会发生找不到目标编辑器所在位置的情况(比如我使用的VSCode),这时可以随便找一个.py文件,右键选择“Properties”,然后在“open with”中选择默认打开应用,比如我这里选择vscode作为默认编辑器。
这些设置完成之后,就可以开始编辑该模块的Python代码啦。在初次打开编辑器时我们可以看到该模块中的预定义代码段如下:
"""
Embedded Python Blocks:

Each time this file is saved, GRC will instantiate the first class it finds
to get ports and parameters of your block. The arguments to __init__  will
be the parameters. All of them are required to have default values!
"""

import numpy as np
from gnuradio import gr


class blk(gr.sync_block):  # other base classes are basic_block, decim_block, interp_block
    """Embedded Python Block example - a simple multiply const"""

    def __init__(self, example_param=1.0):  # only default arguments here
        """arguments to this function show up as parameters in GRC"""
        gr.sync_block.__init__(
            self,
            name='Embedded Python Block',   # will show up in GRC
            in_sig=[np.complex64],
            out_sig=[np.complex64]
        )
        # if an attribute with the same name as a parameter is found,
        # a callback is registered (properties work, too).
        self.example_param = example_param

    def work(self, input_items, output_items):
        """example: multiply with constant"""
        output_items[0][:] = input_items[0] * self.example_param
        return len(output_items[0])
初始代码段中定义一个类blk,类初始化函数中需要定义用到的变量,并且这些变量必须要有默认值。代码中默认为example_block=1.0,该变量就是在前述General界面中看到的那个变量。
在下面代码是对模块的初始化定义。
        gr.sync_block.__init__(
            self,
            name='Embedded Python Block',   # will show up in GRC
            in_sig=[np.complex64],
            out_sig=[np.complex64]
        )
name是对模块的命名,可以看出原始命名为“Embedded python Block”。in_sig以及out_sig是输出信号的数据类型,可以根据需要自行修改。如果想使用向量格式的变量,则在方括号中可以使用例如(np.float, len),就是定义一个float类型长度为len的向量。下面的work函数是用来填写数据处理的主代码的,最终模块会调用该函数完成预设的功能。
3、举一个李子
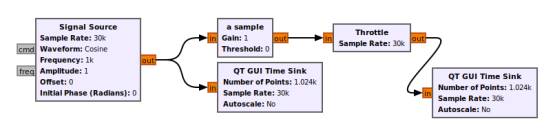
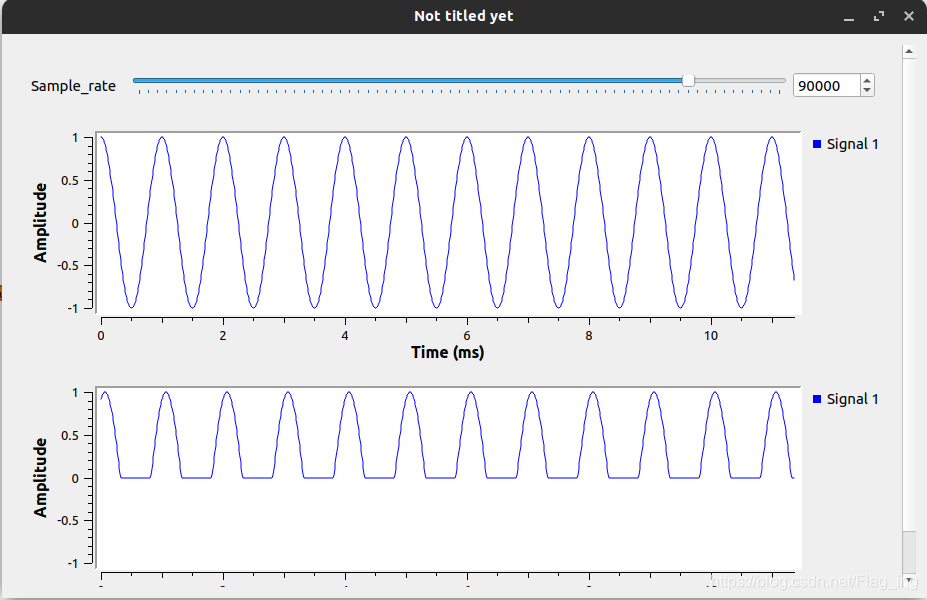
这个流图很简单,其作用是对一个余弦波的幅度进行限幅,超过阈值的部分通过,否则就赋值为0。图中的Embedded python Block模块已改名为a sample
修改后的代码如下:
class blk(gr.sync_block):  # other base classes are basic_block, decim_block, interp_block
    """Embedded Python Block example - a simple multiply const"""
    # 定义增益系数与阈值
    def __init__(self, gain = 1.0, threshold = 0):  # only default arguments here
        """arguments to this function show up as parameters in GRC"""
        gr.sync_block.__init__(
            self,
            name='a sample',      # 模块命名
            in_sig=[np.float32],  # 输入数据类型
            out_sig=[np.float32]  # 输出数据类型
        )
        # if an attribute with the same name as a parameter is found,
        # a callback is registered (properties work, too).
        self.gain = gain  # 赋初值
        self.threshold = threshold

    # input_items:输入数据缓冲区
    # output_items:输出数据缓冲区
    def work(self, input_items, output_items):
        for i in range(len(input_items[0])):
            if(input_items[0][i] > self.threshold):  # 比较
                output_items[0][i] = input_items[0][i] * self.gain  # 乘增益系数
            else:
                output_items[0][i] = 0
        return len(output_items[0])
对照代码可知,模块中显示的两个变量gain和threshold就是在代码初始化中定义的两个变量,在代码的编辑过程中直接Ctrl+S保存代码,变量名就会实时地更新到模块中显示。运行流图就会得到以下结果:
如果想让变量gain和threshold能像samp_rate一样可以使用滑块来赋值,操作起来也很简单,本质上讲跟其他现成模块的操作是一样的,如下所示:
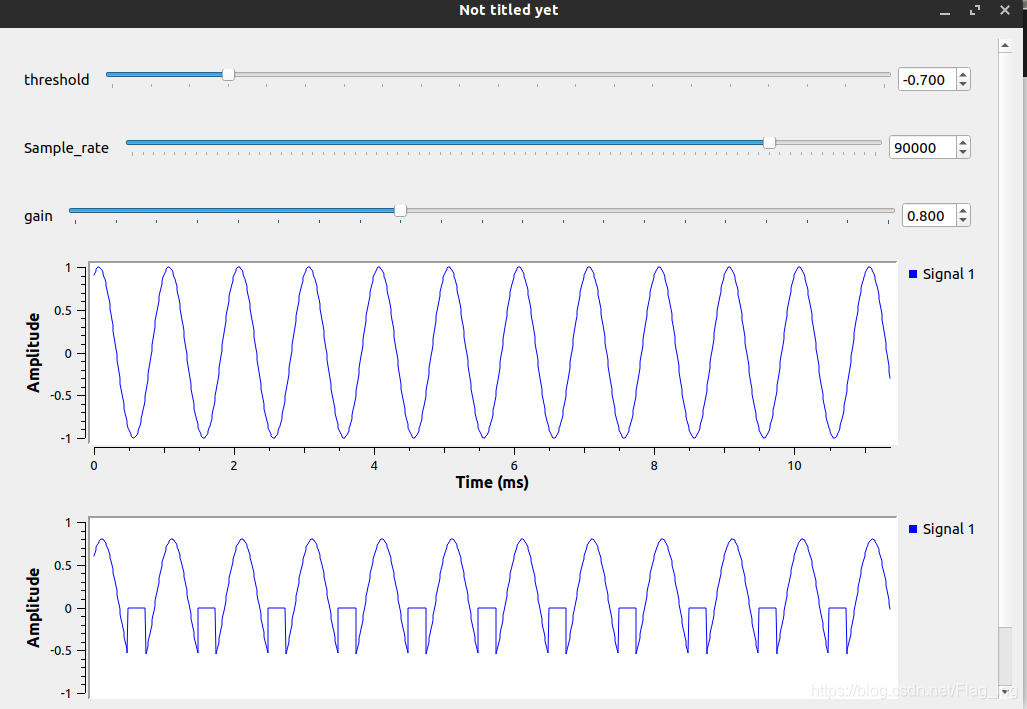
在重新生成流图并运行,结果如下:

GitCode 天启AI是一款由 GitCode 团队打造的智能助手,基于先进的LLM(大语言模型)与多智能体 Agent 技术构建,致力于为用户提供高效、智能、多模态的创作与开发支持。它不仅支持自然语言对话,还具备处理文件、生成 PPT、撰写分析报告、开发 Web 应用等多项能力,真正做到“一句话,让 Al帮你完成复杂任务”。
更多推荐


 15
15 0
0- 0


 已为社区贡献2条内容

所有评论(0)