
vst和vst3插件_如何使用VST插件改善Twitch流音频
vst和vst3插件Twitch streamers with noisy microphones will be happy to hear that OBS, the most popular live streaming program, has support for audio plugins in the form of VSTs. It’s a little-known featur

vst和vst3插件

Twitch streamers with noisy microphones will be happy to hear that OBS, the most popular live streaming program, has support for audio plugins in the form of VSTs. It’s a little-known feature hidden away behind a bunch of menus but can significantly improve your audio quality.
带有嘈杂麦克风的Twitch流媒体将很高兴听到最流行的实时流媒体节目OBS支持VST形式的音频插件。 这是一个鲜为人知的功能,隐藏在许多菜单后面,但可以显着改善音频质量。
Virtual Studio Technologies (VSTs) serve as an interface between an audio processing program and any other application that supports them, like OBS. You can get VSTs that act as instruments for music production software, but the ones that matter for OBS users are VSTfx plugins, which act as audio effects.
Virtual Studio Technologies( VST )用作音频处理程序和支持它们的任何其他应用程序(如OBS)之间的接口。 您可以获取充当音乐制作软件工具的VST,但对OBS用户而言重要的是VSTfx插件,该插件充当音频效果。
For those of you that use Streamlabs OBS, you’ll also be able to use VSTs, as it is based on regular OBS.
对于使用Streamlabs OBS的那些人,您还可以使用VST,因为它是基于常规OBS的。
安装插件 (Installing Plugins)
The process for installing plugins can vary depending on which plugins you have. For most of them though, they’ll go in C:/Program Files/VSTPlugins/ , and will be in separate folders organized by plugin or manufacturer name.
安装插件的过程可能会有所不同,具体取决于您拥有的插件。 对于大多数用户而言,它们将位于C:/Program Files/VSTPlugins/ ,并将位于按插件或制造商名称组织的单独文件夹中。
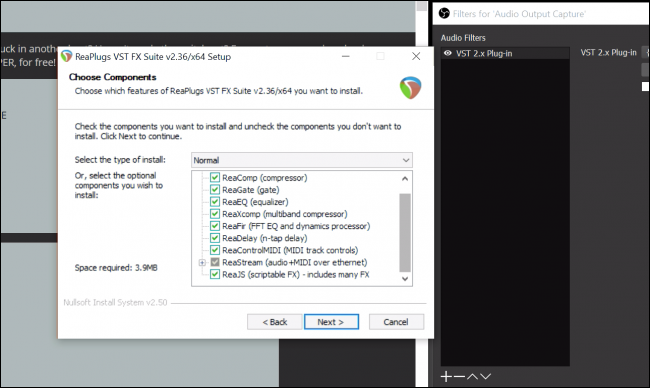
A lot of VST plugins do cost money, but here we’ll be setting up the ReaPlugs VST Suite, which is entirely free. It also comes with an installer, so you don’t have to worry about copying them to the right folder. Just click through the installer and let it set things up for you.
很多VST插件确实要花钱,但是在这里我们将设置ReaPlugs VST Suite ,它是完全免费的。 它还带有安装程序,因此您不必担心将它们复制到正确的文件夹中。 只需单击安装程序,然后为您进行设置即可。
设置OBS (Setting Up OBS)
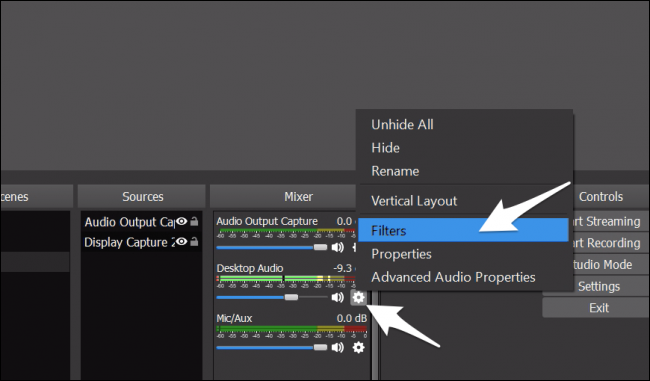
To get started, you’ll want to right-click the audio device you want to use and then select “Filters.”
首先,您需要右键单击要使用的音频设备,然后选择“过滤器”。
OBS has a few basic plugins of its own, mostly for noise control, but we’ll be using the “VST 2.x Plug-in” option.
OBS有自己的一些基本插件,主要用于噪声控制,但是我们将使用“ VST 2.x插件”选项。
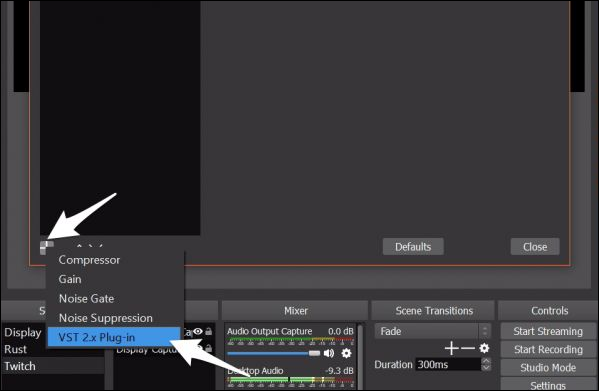
Here you can select the plugin you’d like to add. We’ll configure “reafir_standalone” first as it’s pretty useful for EQ and noise suppression.
在这里,您可以选择要添加的插件。 我们将首先配置“ reafir_standalone”,因为它对于均衡器和噪声抑制非常有用。

You can add multiple plugins as well, which you’ll need to do if you want to use different plugins from ReaPlugs. Once you’ve got them added, that’s all the work you’ll need to do in OBS itself.
您也可以添加多个插件,如果要使用ReaPlugs的其他插件,则需要这样做。 一旦添加了它们,这就是您在OBS本身中需要做的所有工作。
调整插件设置 (Adjusting Plugin Settings)
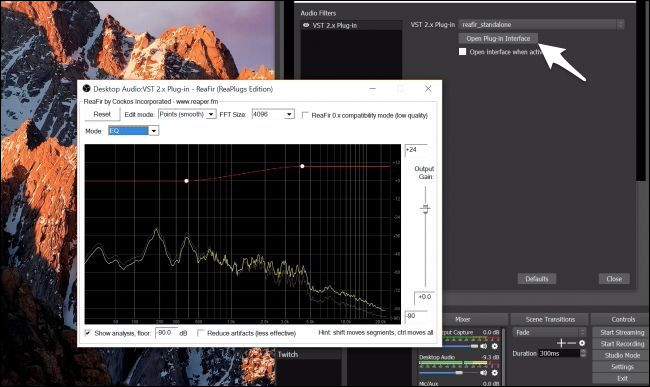
After OBS is set up, you’ll have to configure the actual plugin settings. Each VST plugin has its own interface that opens in a separate window. You’ll want to click the “Open Plug-in Interface” button right below the drop-down to get there.
设置OBS之后,您必须配置实际的插件设置。 每个VST插件都有其自己的界面,该界面在单独的窗口中打开。 您将要单击下拉菜单下方的“打开插件界面”按钮以到达此处。
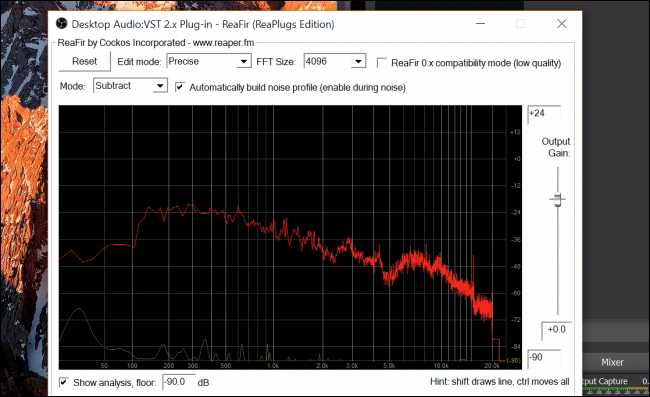
The first useful feature is the subtractive EQ, which can capture a noise profile and adjust the EQ accordingly. Select “Subtract” as the mode and stay quiet for a bit while you turn on “Automatically build noise profile.” You’ll see the red EQ profile change to match the room noise. You’ll want to turn the capturing off after a few seconds though, or it will start filtering your voice out.
第一个有用的功能是减法均衡器,它可以捕获噪声轮廓并相应地调整均衡器。 选择“减法”作为模式,并在打开“自动生成噪声轮廓”时保持安静一会儿。 您会看到红色的EQ配置文件发生变化,以匹配房间的噪音。 不过,您需要在几秒钟后关闭捕获功能,否则它将开始过滤您的声音。
The ReaFir plugin can do normal EQ and has a built-in compressor and noise gate. But the ReaComp plugin gives much greater control over the compressor. Audio compression is not the same as file compression and can make the audio sound worse. It is used to make your audio more uniform, boosting your quiet parts and toning down when you get loud.
ReaFir插件可以执行常规EQ,并具有内置的压缩器和噪声门。 但是ReaComp插件提供了对压缩器的更大控制。 音频压缩与文件压缩不同,它会使音频声音变差。 它用于使音频更均匀,增强安静的部分并在声音变大时降低声音。
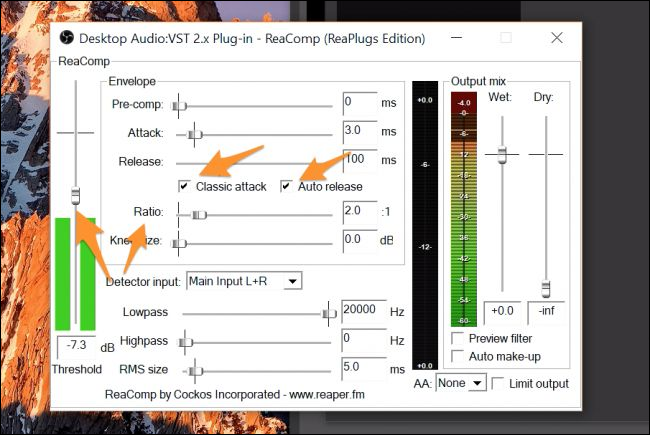
You’ll have to add this as a second plugin to use it alongside ReaFir. The main options you’ll want to configure are the two checkboxes: the ratio (how much compression to add) and the threshold, which you’ll want to set right at the loudest you’ll expect your audio to be. You’ll want to yell into your microphone a little bit for this part. The ratio you can leave around two, but if you often yell at the games you play, you can turn it up to four or more, so you don’t break your viewers’ headphones.
您必须将其添加为第二个插件,才能与ReaFir一起使用。 您要配置的主要选项是两个复选框:比率(要添加的压缩量)和阈值,您希望将其设置为您希望音频达到的最大声响。 对于这一部分,您需要向麦克风大喊。 您可以保留大约2的比例,但是如果您经常对自己玩的游戏大喊大叫,则可以将比例提高到4或更大,这样就不会破坏观众的耳机。
打开音频监视以进行调试 (Turning on Audio Monitoring for Debugging)
These particular settings will vary depending on which plugins you are using. There are thousands of VST plugins, so we can’t possibly cover them all. However, you can listen to your audio while you adjust the settings, which will help you find the correct buttons to push in an unfamiliar plugin.
这些特定设置将根据您使用的插件而有所不同。 VST插件有成千上万,因此我们不可能一一涵盖。 但是,您可以在调整设置时收听音频,这将帮助您找到正确的按钮以插入不熟悉的插件。
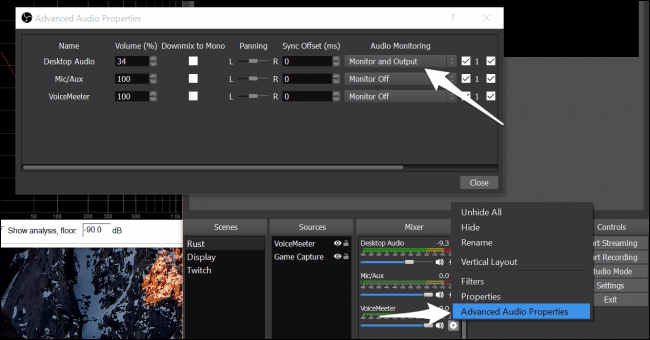
You can turn it on under “Advanced Audio Properties.” Set the “Audio Monitoring” of your microphone to be “Monitor and Output.” It may sound a bit weird as software monitoring is much slower than hardware monitoring (which you may use if you have an external DAC), so it’s probably not good to leave it on for normal use. Also, make sure you put on headphones, so your microphone doesn’t pick up the output. Otherwise, you could have a very loud feedback loop.
您可以在“高级音频属性”下将其打开。 将麦克风的“音频监视”设置为“监视和输出”。 听起来有些奇怪,因为软件监视比硬件监视慢得多(如果有外部DAC,则可以使用硬件监视),因此将其打开以进行正常使用可能不好。 另外,请确保戴上耳机,以免麦克风收音。 否则,您的反馈回路可能会很大。
Image Credit: VasiliyBudarin/Shutterstock
图片来源: VasiliyBudarin / Shutterstock
翻译自: https://www.howtogeek.com/367910/how-to-improve-your-twitch-stream-audio-with-vst-plugins/
vst和vst3插件

GitCode 天启AI是一款由 GitCode 团队打造的智能助手,基于先进的LLM(大语言模型)与多智能体 Agent 技术构建,致力于为用户提供高效、智能、多模态的创作与开发支持。它不仅支持自然语言对话,还具备处理文件、生成 PPT、撰写分析报告、开发 Web 应用等多项能力,真正做到“一句话,让 Al帮你完成复杂任务”。
更多推荐


 0
0 0
0- 0


 已为社区贡献4条内容

所有评论(0)