
深度解析:AI Agent 实战之 MCP 开发指南
MCP(Model Context Protocol,模型上下文协议)是 Anthropic 于 2024 年 11 月推出的开放标准,旨在为大语言模型(LLM)提供统一、标准化的方式与外部数据源和工具通信,解决传统 AI 集成架构碎片化、扩展困难的问题。
上文介绍了MCP的概念和核心架构等理论,接下来我们来进行开发实战。
一、MCP Server 开发
我们以Stdio方式,使用Python开发Server端。本地需要安装uvx。
1、初始化项目
#使用
uv init muxue-mcp

# 进入项目目录
cd muxue-mcp

# 创建虚拟环境
uv venv

# 激活环境
.venv\Scripts\activate


# 安装依赖
uv add "mcp[cli]" httpx
2、编写核心代码
我们创建一个查询天气的Server服务,PyCharm打开项目,创建文件weather_serv.py,
首先我们一个代码骨架,仅包含最基本的代码:
from mcp.server.fastmcp import FastMCP
from pydantic import Field
import httpx
import json
import os
import logging
logger = logging.getLogger("mcp")

# Initialize FastMCP server
mcp = FastMCP("weather")


# 定义工具
@mcp.tool(description="高德天气查询,输入城市名,返回该城市的天气情况,例如:北京")
async def query_weather(city: str = Field(description="要查询天气的城市名称")) -> str:
    """
    高德天气查询

    Args:
        city: 要查询天气的城市名称

    Returns:
        要查询城市的天气信息
    """

    logger.info("收到查询天气请求,城市名:{}".format(city))

    contents = []
    content = {
                'date': '2025-5-21',
                'week': '4',
                'dayweather': '晴朗',
                'daytemp_float': '14.0',
                'daywind': '北',
                'nightweather': '多云',
                'nighttemp_float': '4.0'
    }
    contents.append(content)
    return json.dumps(contents, ensure_ascii=False)


if __name__ == "__main__":
    # Initialize and run the server
    mcp.run(transport='stdio')
(1)FastMCP 介绍
FastMCP 是一个基于 Python 的高性能框架,旨在简化构建 MCP(Model Context Protocol)服务器和客户端的过程。它允许开发者以最少的代码量,将本地工具、数据资源和交互能力暴露给大型语言模型(LLM),如 Claude、ChatGPT 或 Cursor,使 AI 助手能够调用本地功能,执行计算、访问数据或处理文件等任务。
FastMCP 的核心功能
-
工具(Tools)
通过@mcp.tool()装饰器,将 Python 函数注册为可被 LLM 调用的工具,类似于 API 的 POST 请求。 -
资源(Resources)
定义静态或动态的数据资源,供 LLM 加载上下文信息,类似于 API 的 GET 请求。 -
提示模板(Prompts)
创建可复用的交互模板,帮助规范 LLM 的对话行为。 -
自动协议处理
自动处理 MCP 协议的底层细节,如参数验证、错误处理和模式生成,开发者无需手动编写复杂的协议解析代码。 -
异步支持
支持异步编程,提升服务器的并发处理能力。
(2)初始化FastMCP
# 创建一个名为“weather”的FastMCP服务器实例。
mcp = FastMCP("weather")
(3)定义工具
使用 @mcp.tool 装饰器装饰在具体的工具函数上,定义一个“高德天气查询助手”的工具。@mcp.tool(name="get_weather") name可不写,若写,则只能是英文、数字和下划线。
query_weather函数是一个异步函数,接受一个城市名称作为参数,并返回该城市的天气信息。一个python文件中可以定义多个工具。
注意:与Function Call 或 Tool call 类似,LLM大模型需知道函数能做什么以及所需参数,才能从自然语言中分析出该调用哪个工具函数以及传入相应的参数。
因此,写好函数的文档注释至关重要!一定要将函数描述、描述和返回值写明白。
(4)main入口函数
if __name__ == "__main__":
    # Initialize and run the server
    mcp.run(transport='stdio')
run 启动FastMCP对象,启动方式为 stdio, 这种是标准的输入输出的方式,后面再介绍sse的方式。
(5)完整的示例代码
调用高德地图的接口,查询天气信息,完整的示例代码如下。
from mcp.server.fastmcp import FastMCP
from pydantic import Field
import httpx
import json
import os
from dotenv import load_dotenv
import logging

logger = logging.getLogger("mcp")

# Initialize FastMCP server
mcp = FastMCP("weather")
# 加载环境变量
load_dotenv()


# 定义工具
@mcp.tool(description="高德天气查询,输入城市名,返回该城市的天气情况,例如:北京")
async def query_weather(city: str = Field(description="要查询天气的城市名称")) -> str:
    """
    高德天气查询

    Args:
        city: 要查询天气的城市名称

    Returns:
        要查询城市的天气信息
    """

    logger.info("收到查询天气请求,city_name:{}".format(city))
    api_key = os.getenv("GAODE_KEY")
    if not api_key:
        return "请先设置GAODE_KEY环境变量"
    api_domain = 'https://restapi.amap.com/v3'
    url = f"{api_domain}/config/district?keywords={city}"f"&subdistrict=0&extensions=base&key={api_key}"
    headers = {"Content-Type": "application/json; charset=utf-8"}
    async with httpx.AsyncClient(headers=headers) as client:
        response = await client.get(url)
        if response.status_code != 200:
            return "查询失败"

        city_info = response.json()
        if city_info["info"] != "OK":
            return "获取城市信息查询失败"
        CityCode = city_info['districts'][0]['adcode']
        weather_url = f"{api_domain}/weather/weatherInfo?city={CityCode}&extensions=all&key={api_key}"
        weatherInfo_response = await client.get(weather_url)
        if weatherInfo_response.status_code != 200:
            return "查询天气信息失败"
        weatherInfo = weatherInfo_response.json()
        if weatherInfo['info'] != "OK":
            return "查询天气信息失败"
        weatherInfo_data = weatherInfo_response.json()
        contents = []
        if len(weatherInfo_data.get('forecasts')) <= 0:
            return "没有获取到该城市的天气信息"
        for item in weatherInfo_data['forecasts'][0]['casts']:
            content = {
                'date': item.get('date'),
                'week': item.get('week'),
                'dayweather': item.get('dayweather'),
                'daytemp_float': item.get('daytemp_float'),
                'daywind': item.get('daywind'),
                'nightweather': item.get('nightweather'),
                'nighttemp_float': item.get('nighttemp_float')
            }
            contents.append(content)
        return json.dumps(contents, ensure_ascii=False)


if __name__ == "__main__":
    # Initialize and run the server
    mcp.run(transport='stdio')
3、本地调试
mcp 官方提供了一个本地调试工具 inspector,我们先使用它来进行调试。github地址如下:
https://github.com/modelcontextprotocol/inspector
# cmd种执行本地调试命令
mcp dev D:\\Test\\muxue-mcp\\weather_serv.py
执行结果如下:
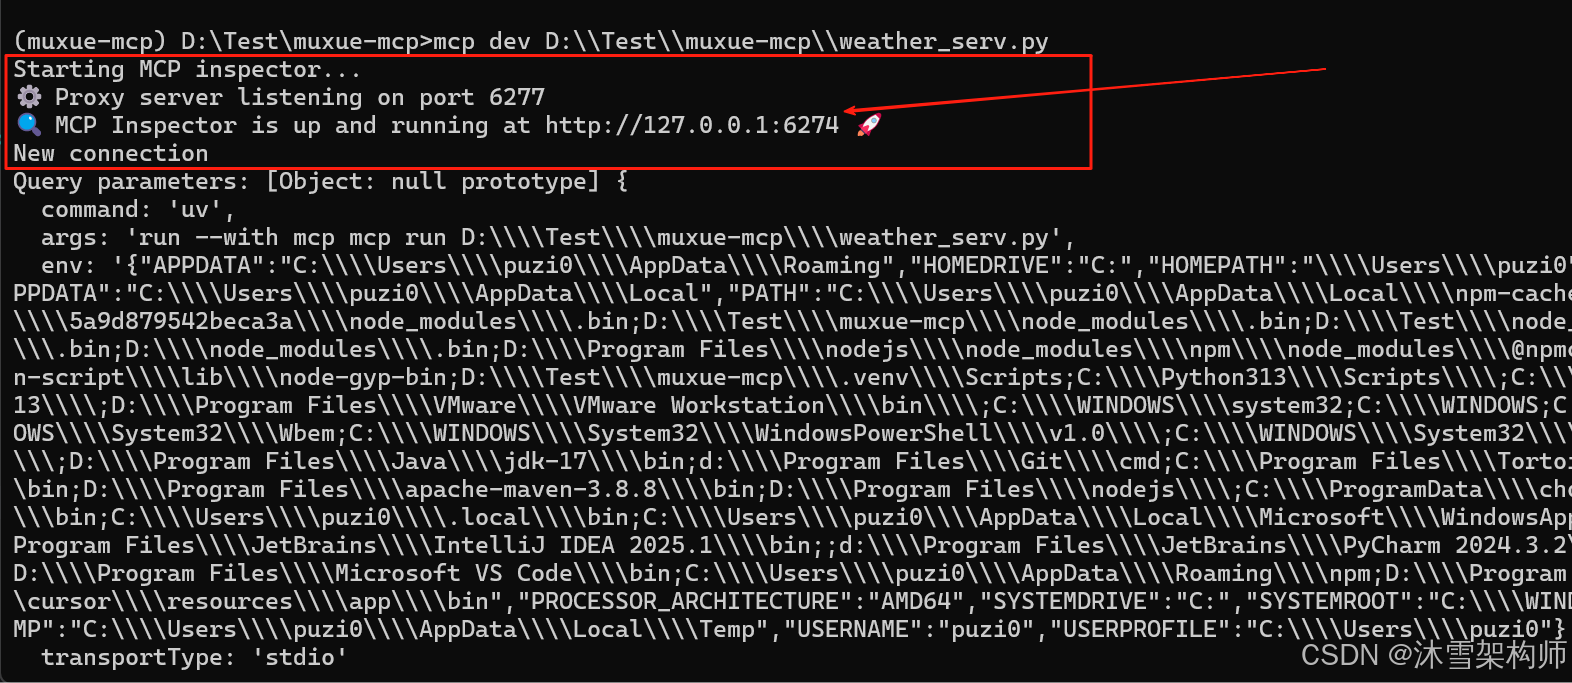
在浏览器中打开网址后,点击左侧的“Connect” 按钮,点击“Tools”-->"List Tools",就可以看到本示例代码的函数了,输入城市即可运行。

4、客户端软件连接Server代码
MCP的客户端有很多,我们常用的有 Cursor、Cherry Studio、Cline(VS Code插件)等。我们拿Cursor软件来连接开发的Server端。
在mcp.json里mcpServers节点下创建子节点:
    "chinaWeather": {
        "command": "uv",
        "args": [
            "--directory",
            "D:\\Test\\muxue-mcp",
            "run",
            "weather_serv.py"
        ]
    }
完整的如下: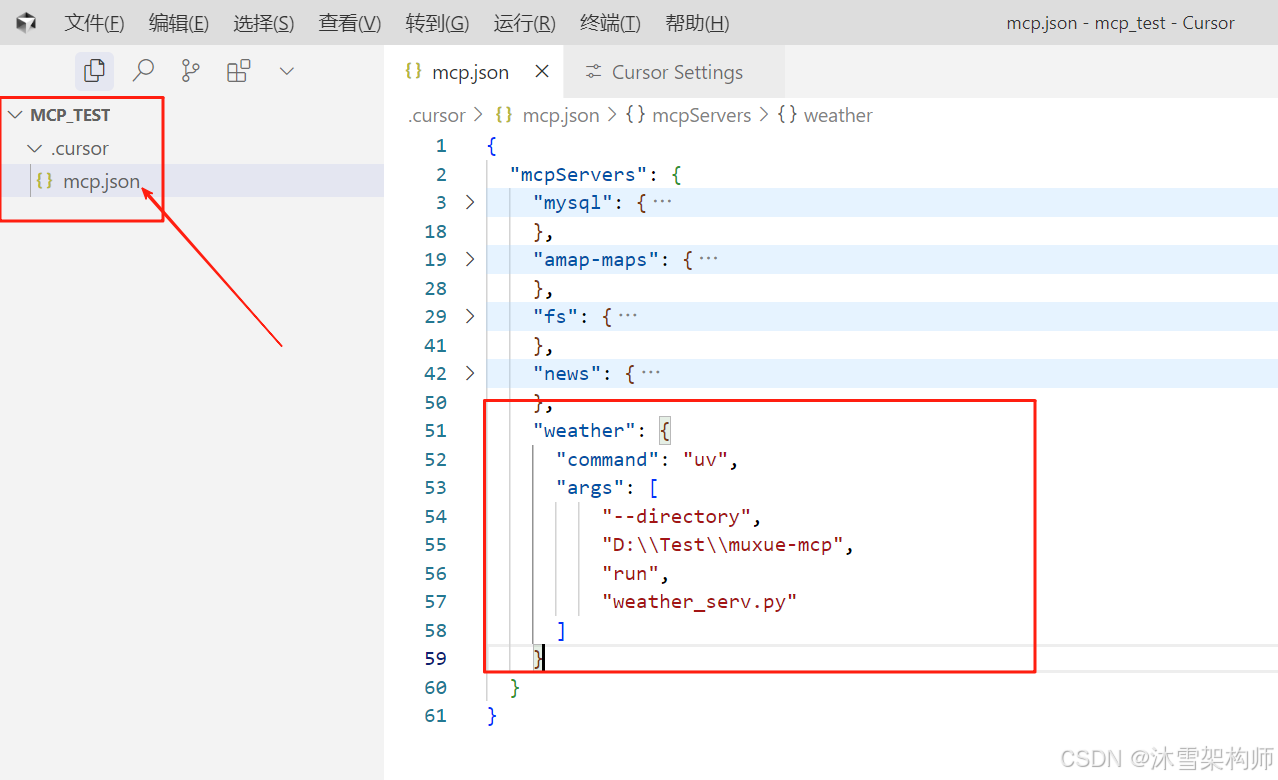
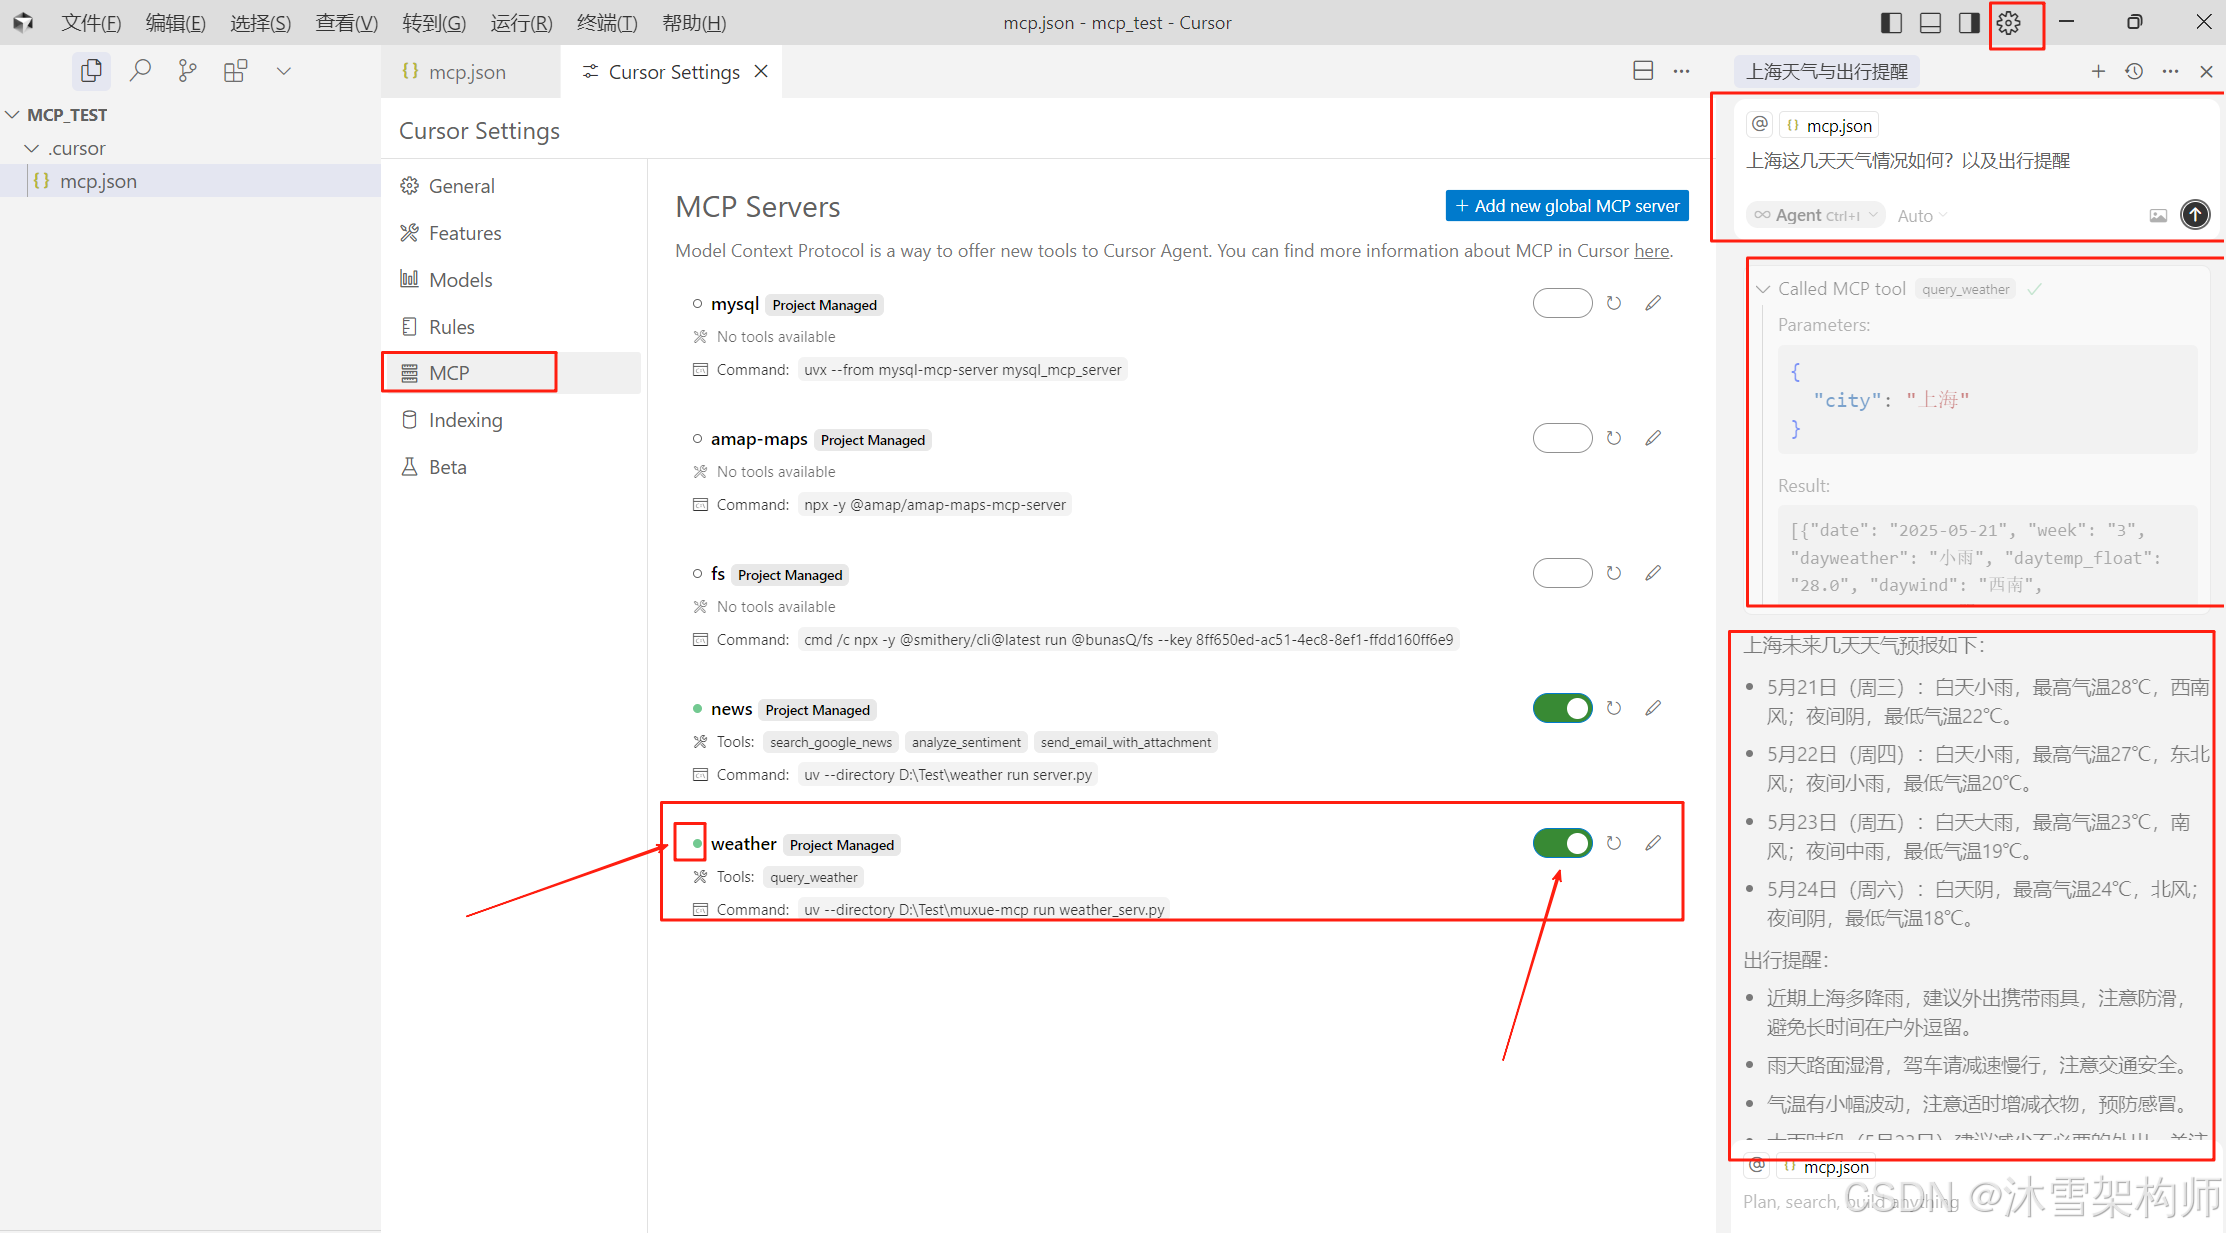
Cursor Settings - MCP 开启 chinaWeather服务。状态为绿色表示可用。在右上输入“上海这几天天气情况如何?以及出行提醒”,就会执行MCP的Server工具。
MCP Server端的开发就这么完美的结束了,是不是很简单!
二、MCP Client开发
MCP Client一般集成在MCP Host中,因此本处开发的代码,一般都会放在Client 工具内,或自己开发的Agent代码内部。开发语言可以使用Python,Nodejs,Java,C#等各种主流语言。我们才有Python来开发。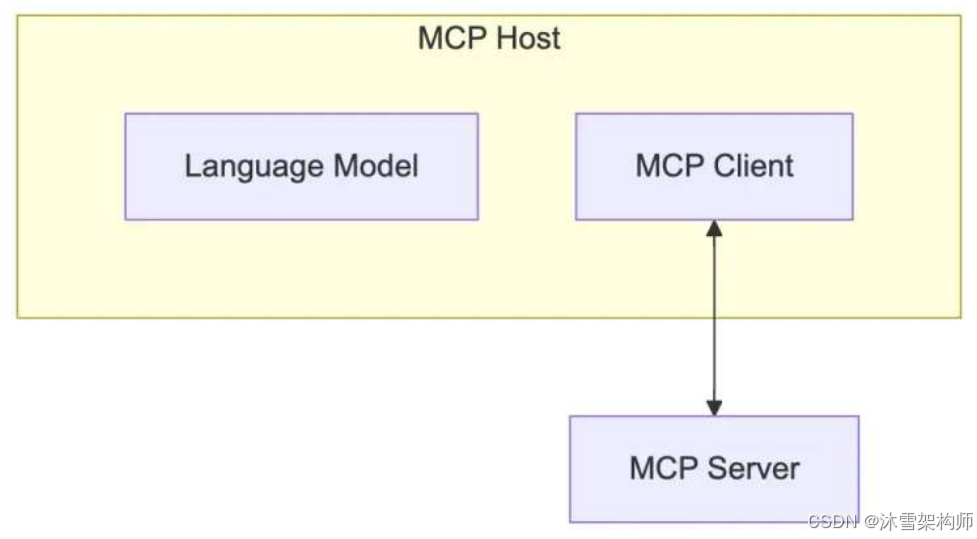
1、初始化项目
# 创建项目
uv init mcp-client
cd mcp-client

# 创建虚拟环境
uv venv

# 激活虚拟环境
# On Windows:
.venv\Scripts\activate
# On Unix or MacOS:
source .venv/bin/activate

# 安装必备包
uv add mcp  python-dotenv openai

# 删除样板文件
# On Windows:
del main.py
# On Unix or MacOS:
rm main.py
使用PyCharm打开项目后,创建client.py文件和.env环境配置文件。
2、定义MCPClient类
import asyncio
import os
import json
from typing import Optional, List
from contextlib import AsyncExitStack
from datetime import datetime
import re
from openai import OpenAI
from dotenv import load_dotenv
from mcp import ClientSession, StdioServerParameters
from mcp.client.stdio import stdio_client
load_dotenv()


class MCPClient:

    def __init__(self):
        self.exit_stack = AsyncExitStack()
        self.openai_api_key = os.getenv("DASHSCOPE_API_KEY")
        self.base_url = os.getenv("BASE_URL")
        self.model = os.getenv("MODEL")
        if not self.openai_api_key:
            raise ValueError("❌ 未找到 OpenAI API Key,请在 .env 文件中设置 DASHSCOPE_API_KEY")
        self.client = OpenAI(api_key=self.openai_api_key, base_url=self.base_url)
        self.session: Optional[ClientSession] = None
这里定义了大模型,使用OpenAI的兼容客户端,.env配置文件里设置大模型的相关参数,比如可以使用硅基、DeepSeek、智谱清言等。
BASE_URL="https://api.siliconflow.cn/v1"
MODEL=Qwen/Qwen2.5-32B-Instruct
DASHSCOPE_API_KEY="sk-yourapikey"
2、连接MCP Server端
接下来,我们将实现连接到 MCP 服务器的方法:
    async def connect_to_server(self, server_script_path: str):
        # 对服务器脚本进行判断,只允许是 .py 或 .js
        is_python = server_script_path.endswith('.py')
        is_js = server_script_path.endswith('.js')
        if not (is_python or is_js):
            raise ValueError("服务器脚本必须是 .py 或 .js 文件")

        # 确定启动命令,.py 用 python,.js 用 node
        command = "python" if is_python else "node"

        # 构造 MCP 所需的服务器参数,包含启动命令、脚本路径参数、环境变量(为 None 表示默认)
        server_params = StdioServerParameters(command=command, args=[server_script_path], env=None)

        # 启动 MCP 工具服务进程(并建立 stdio 通信)
        stdio_transport = await self.exit_stack.enter_async_context(stdio_client(server_params))

        # 拆包通信通道,读取服务端返回的数据,并向服务端发送请求
        self.stdio, self.write = stdio_transport

        # 创建 MCP 客户端会话对象
        self.session = await self.exit_stack.enter_async_context(ClientSession(self.stdio, self.write))

        # 初始化会话
        await self.session.initialize()

        # 获取工具列表并打印
        response = await self.session.list_tools()
        tools = response.tools
        print("\n已连接到服务器,支持以下工具:", [tool.name for tool in tools])
根据Stdio构建相关参数,建立与Server通信,初始化会话,Server返回工具列表。
3、查询逻辑处理
现在,让我们添加用于处理查询和处理工具调用的核心功能:
    async def process_query(self, query: str) -> str:
        # 准备初始消息和获取工具列表
        messages = [{"role": "user", "content": query}]
        tool_response = await self.session.list_tools()

        available_tools = [
            {
                "type": "function",
                "function": {
                    "name": tool.name,
                    "description": tool.description,
                    "parameters": tool.inputSchema
                }
            } for tool in tool_response.tools
        ]

        # 更新查询,将文件名添加到原始查询中,使大模型在调用工具链时可以识别到该信息
        # 然后调用 plan_tool_usage 获取工具调用计划
        messages = [{"role": "user", "content": query.strip()}]

        print("\n📤 提交给大模型的工具定义:")
        print(json.dumps(available_tools, ensure_ascii=False, indent=2))

        # 构造对话上下文并调用模型。
        # 将系统提示和用户的自然语言一起作为消息输入,并选用当前的模型。
        planning_messages = [
            {"role": "user", "content": query}
        ]

        tool_response = self.client.chat.completions.create(
            model=self.model,
            messages=planning_messages,
            tools=available_tools
        )

        print("需要调用哪些工具:",tool_response)

        final_text = []

        for content in tool_response.choices:
            if content.finish_reason != 'tool_calls':
                final_text.append(content.message.content)
            elif content.finish_reason == 'tool_calls':
                for tool_call in content.message.tool_calls:
                    tool_name = tool_call.function.name
                    tool_args = tool_call.function.arguments
                    print(f"本次调用工具 {tool_name},参数 {tool_args}")

                    # Execute tool call
                    result = await self.session.call_tool(tool_name,  json.loads(tool_args))
                    final_text.append(f"[Calling tool {tool_name} with args {tool_args}]")

                    # Continue conversation with tool results
                    if hasattr(content.message, 'content') and content.message.content:
                        messages.append({
                            "role": "assistant",
                            "content": content.message.content
                        })
                    messages.append({
                        "role": "user",
                        "content": result.content
                    })

                    # Get next response from Claude
                    synthesizer_response = self.client.chat.completions.create(
                        model=self.model,
                        max_tokens=4096,
                        messages=messages,
                    )

                    final_text.append(synthesizer_response.choices[0].message.content)

        return "\n".join(final_text)
从代码中可以看到,使用了大模型的tools参数, 目前这个方法只适合Server端只有一个工具,因为 openai接口一次最多只返回一个工具。
4、交互式对话
现在,我们将添加聊天循环和清理功能:
 async def chat_loop(self):
        # 初始化提示信息
        print("\n🤖 MCP 客户端已启动!输入 'quit' 退出")

        # 进入主循环中等待用户输入
        while True:
            try:
                query = input("\n你: ").strip()
                if query.lower() == 'quit':
                    break

                # 处理用户的提问,并返回结果
                response = await self.process_query(query)
                print(f"\n🤖 AI: {response}")

            except Exception as e:
                print(f"\n⚠️ 发生错误: {str(e)}")


    # 定义一个异步函数cleanup,用于清理资源
    async def cleanup(self):
        # 等待exit_stack关闭
        await self.exit_stack.aclose()
5、入口Main方法
async def main():
    server_script_path = r"D:\Test\mcp-project\server.py"
    client = MCPClient()
    try:
        await client.connect_to_server(server_script_path)
        await client.chat_loop()
    finally:
        await client.cleanup()


if __name__ == "__main__":
    asyncio.run(main())
6、完整的示例代码
import asyncio
import os
import json
from typing import Optional, List
from contextlib import AsyncExitStack
from datetime import datetime
import re
from openai import OpenAI
from dotenv import load_dotenv
from mcp import ClientSession, StdioServerParameters
from mcp.client.stdio import stdio_client

load_dotenv()


class MCPClient:

    def __init__(self):
        self.exit_stack = AsyncExitStack()
        self.openai_api_key = os.getenv("DASHSCOPE_API_KEY")
        self.base_url = os.getenv("BASE_URL")
        self.model = os.getenv("MODEL")
        if not self.openai_api_key:
            raise ValueError("❌ 未找到 OpenAI API Key,请在 .env 文件中设置 DASHSCOPE_API_KEY")
        self.client = OpenAI(api_key=self.openai_api_key, base_url=self.base_url)
        self.session: Optional[ClientSession] = None

    async def connect_to_server(self, server_script_path: str):
        # 对服务器脚本进行判断,只允许是 .py 或 .js
        is_python = server_script_path.endswith('.py')
        is_js = server_script_path.endswith('.js')
        if not (is_python or is_js):
            raise ValueError("服务器脚本必须是 .py 或 .js 文件")

        # 确定启动命令,.py 用 python,.js 用 node
        command = "python" if is_python else "node"

        # 构造 MCP 所需的服务器参数,包含启动命令、脚本路径参数、环境变量(为 None 表示默认)
        server_params = StdioServerParameters(command=command, args=[server_script_path], env=None)

        # 启动 MCP 工具服务进程(并建立 stdio 通信)
        stdio_transport = await self.exit_stack.enter_async_context(stdio_client(server_params))

        # 拆包通信通道,读取服务端返回的数据,并向服务端发送请求
        self.stdio, self.write = stdio_transport

        # 创建 MCP 客户端会话对象
        self.session = await self.exit_stack.enter_async_context(ClientSession(self.stdio, self.write))

        # 初始化会话
        await self.session.initialize()

        # 获取工具列表并打印
        response = await self.session.list_tools()
        tools = response.tools
        print("\n已连接到服务器,支持以下工具:", [tool.name for tool in tools])

    async def process_query(self, query: str) -> str:
        # 准备初始消息和获取工具列表
        messages = [{"role": "user", "content": query}]
        tool_response = await self.session.list_tools()

        available_tools = [
            {
                "type": "function",
                "function": {
                    "name": tool.name,
                    "description": tool.description,
                    "parameters": tool.inputSchema
                }
            } for tool in tool_response.tools
        ]

        # 更新查询,将文件名添加到原始查询中,使大模型在调用工具链时可以识别到该信息
        # 然后调用 plan_tool_usage 获取工具调用计划
        messages = [{"role": "user", "content": query.strip()}]

        print("\n📤 提交给大模型的工具定义:")
        print(json.dumps(available_tools, ensure_ascii=False, indent=2))

        # 构造对话上下文并调用模型。
        # 将系统提示和用户的自然语言一起作为消息输入,并选用当前的模型。
        planning_messages = [
            {"role": "user", "content": query}
        ]

        tool_response = self.client.chat.completions.create(
            model=self.model,
            messages=planning_messages,
            tools=available_tools
        )

        print("需要调用哪些工具:",tool_response)

        final_text = []

        for content in tool_response.choices:
            if content.finish_reason != 'tool_calls':
                final_text.append(content.message.content)
            elif content.finish_reason == 'tool_calls':
                for tool_call in content.message.tool_calls:
                    tool_name = tool_call.function.name
                    tool_args = tool_call.function.arguments
                    print(f"本次调用工具 {tool_name},参数 {tool_args}")

                    # Execute tool call
                    result = await self.session.call_tool(tool_name,  json.loads(tool_args))
                    final_text.append(f"[Calling tool {tool_name} with args {tool_args}]")

                    # Continue conversation with tool results
                    if hasattr(content.message, 'content') and content.message.content:
                        messages.append({
                            "role": "assistant",
                            "content": content.message.content
                        })
                    messages.append({
                        "role": "user",
                        "content": result.content
                    })

                    # Get next response from Claude
                    synthesizer_response = self.client.chat.completions.create(
                        model=self.model,
                        max_tokens=4096,
                        messages=messages,
                    )

                    final_text.append(synthesizer_response.choices[0].message.content)

        return "\n".join(final_text)


    async def chat_loop(self):
        # 初始化提示信息
        print("\n🤖 MCP 客户端已启动!输入 'quit' 退出")

        # 进入主循环中等待用户输入
        while True:
            try:
                query = input("\n你: ").strip()
                if query.lower() == 'quit':
                    break

                # 处理用户的提问,并返回结果
                response = await self.process_query(query)
                print(f"\n🤖 AI: {response}")

            except Exception as e:
                print(f"\n⚠️ 发生错误: {str(e)}")


    # 定义一个异步函数cleanup,用于清理资源
    async def cleanup(self):
        # 等待exit_stack关闭
        await self.exit_stack.aclose()


async def main():
    #server_script_path = r"D:\Test\muxue-mcp\weather_serv.py"
    server_script_path = r"D:\Test\mcp-project\server.py"
    client = MCPClient()
    try:
        await client.connect_to_server(server_script_path)
        await client.chat_loop()
    finally:
        await client.cleanup()


if __name__ == "__main__":
    asyncio.run(main())
6、运行
python client.py参考文献
https://www.yangyanxing.com/article/use-python-to-develop-mcp-server.html
https://www.yangyanxing.com/article/use-python-to-develop-sse-mcp-server.html

GitCode 天启AI是一款由 GitCode 团队打造的智能助手,基于先进的LLM(大语言模型)与多智能体 Agent 技术构建,致力于为用户提供高效、智能、多模态的创作与开发支持。它不仅支持自然语言对话,还具备处理文件、生成 PPT、撰写分析报告、开发 Web 应用等多项能力,真正做到“一句话,让 Al帮你完成复杂任务”。
更多推荐


 10
10 0
0- 0


 已为社区贡献1条内容

所有评论(0)