
MCP协议实战:从零构建MCP Server
为什么需要MCP?
你有没有遇到过这样的场景:想让AI助手帮你查数据库,结果要自己写一堆胶水代码;想让ChatGPT调用内部API,却发现每个模型的接口都不一样;辛辛苦苦开发了工具,换个平台就完全不能用了。
这就是2024年之前AI工具集成的真实写照——碎片化。
每个AI应用都要为每个数据源开发自己的集成方案,每个模型的Function Calling格式都不一样。你今天为GPT-4写的工具,明天换Claude就得重写一遍。这种重复劳动不仅浪费时间,还让AI工具的生态无法形成规模效应。
MCP(Model Context Protocol)就是为了解决这个问题而生的。
想象一下:如果你的USB设备可以即插即用,不管接到哪个电脑都能用,那该多方便。MCP就是AI应用的"USB-C接口"——提供一个标准化的协议,让AI模型可以无缝连接各种外部工具和数据源。
2024年11月25日,Anthropic正式发布了MCP协议并将其开源。短短一年多时间,它已经成为了AI Agent开发的核心协议之一。2025年12月,Anthropic更是将MCP捐赠给了Linux基金会下的Agentic AI Foundation,标志着它从一个公司项目变成了行业标准。
掌握MCP,你就能:
- 一次构建MCP Server,所有兼容客户端都能用
- 轻松连接数据库、API、文件系统等外部资源
- 构建可复用的AI工具生态系统
- 在面试中展示对AI Agent架构的深入理解
接下来,我们将从零开始,手把手教你构建自己的MCP Server。无论你是想开发AI工具,还是想深入了解AI Agent架构,这篇文章都将为你提供实用的指导。
MCP核心概念与原理
MCP到底是什么?
简单来说,MCP是一个开源标准,用于连接AI应用与外部系统。它定义了一套统一的协议,让AI模型可以以标准化的方式访问工具、数据和提示词。
MCP的核心价值:
- 统一协议:替代碎片化的集成方案
- 一次构建,处处使用:构建一个MCP Server,所有兼容客户端都能调用
- 关注点分离:将提供上下文与LLM交互本身分离
- 标准化通信:使用JSON-RPC 2.0作为通信协议
MCP与Function Calling的详细对比
这是面试和实际开发中最常见的问题。理解它们的区别和联系,是掌握MCP的关键。
| 维度 | Function Calling | MCP |
|---|---|---|
| 定位 | 模型级原语 | 应用级协议 |
| 控制方 | LLM提供商(OpenAI、Anthropic等) | 独立的开源标准 |
| 工具定义 | 嵌入在API请求中 | 外化为可共享的服务 |
| 可移植性 | 绑定特定模型 | 跨模型、跨平台 |
| 工具发现 | 静态定义,编译时确定 | 动态发现,运行时查询 |
| 状态管理 | 无状态 | 支持有状态会话 |
| 安全模型 | 基本的沙箱隔离 | 完整的认证、授权、审计 |
| 适用场景 | 简单的工具调用 | 复杂的工具生态系统 |
关键区别详解:
- 协议层次不同
- Function Calling:模型内部机制,如何请求工具的原语
- MCP:应用层协议,标准化工具的发现、传输、会话管理
- 可移植性差异
- Function Calling:为GPT-4写的工具,换Claude就得重写
- MCP:一个MCP Server,所有支持MCP的客户端都能用
- 工具生命周期
- Function Calling:工具定义随请求发送,无法动态更新
- MCP:支持工具的动态注册、更新、移除
- 生态系统
- Function Calling:各厂商各自为战,生态碎片化
- MCP:统一标准,形成可复用的工具生态
何时选择MCP:
- 需要跨平台使用工具
- 需要动态发现和更新工具
- 需要构建可复用的工具生态
- 需要更完善的安全和会话管理
何时使用Function Calling:
- 仅在单个模型平台使用
- 工具简单且固定
- 不需要跨平台兼容
MCP在AI Agent生态中的位置
AI Agent的架构可以分为四层:
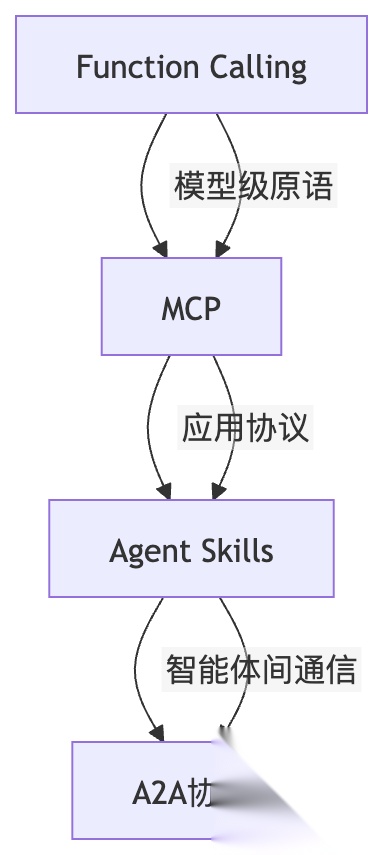
MCP的定位:
- Function Calling:模型级原语,处理模型如何请求工具
- MCP:应用协议,标准化工具发现、传输、会话管理
- Agent Skills:指导智能体如何执行任务的指令
- A2A(Agent-to-Agent):智能体间通信协议
MCP是连接AI客户端与工具和数据的垂直连接层。它在Function Calling之上添加了标准化层,让工具可以跨平台共享。
MCP的设计理念
MCP的设计遵循四个核心理念:
- 开放标准:开源、社区驱动、厂商中立
- 模块化:将工具、资源、提示词作为独立原语
- 可组合:支持构建可组合的集成和工作流
- 安全性:内置安全考虑,包括用户同意和控制
🎯 本章小结: MCP是一个标准化的AI工具集成协议,它解决了碎片化问题,让你的AI工具可以"一次构建,处处使用"。理解MCP的定位和设计理念,是掌握后续内容的基础。
Server/Client架构详解
三层模型
MCP采用Host → Client → Server的三层架构:
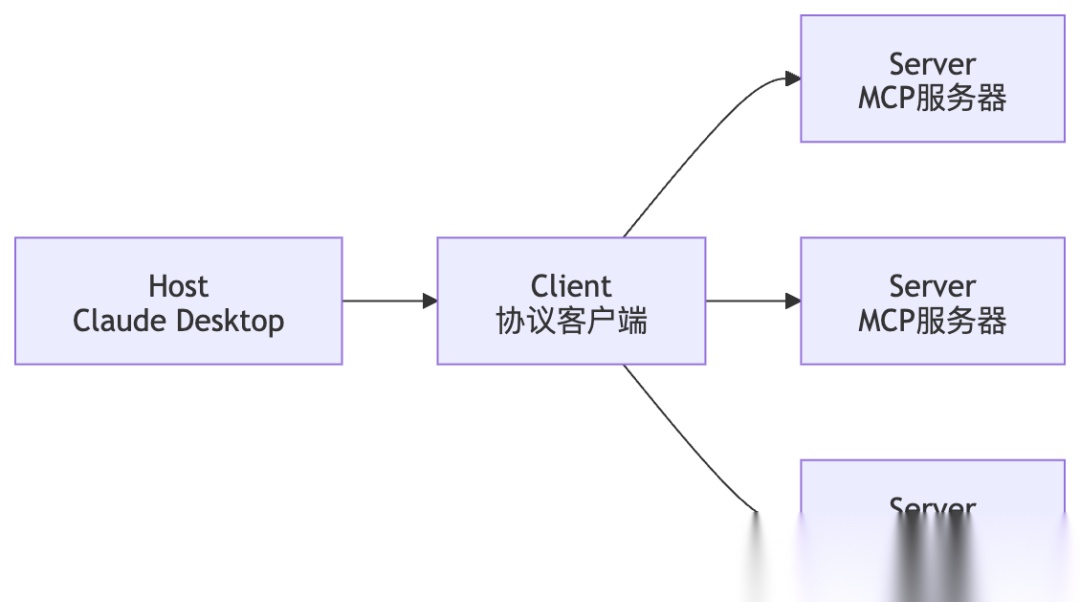
组件职责:
- Host:发起连接的LLM应用(如Claude Desktop、VS Code、Cursor)
- Client:宿主应用内的连接器,管理与服务器的通信
- Server:提供上下文和能力的服务
详细交互流程:
┌─────────────┐ ┌─────────────┐ ┌─────────────┐│ Host │ │ Client │ │ Server ││ (Claude) │────▶│ (协议层) │────▶│ (工具服务) │└─────────────┘ └─────────────┘ └─────────────┘ │ │ │ │ 1. 用户请求 │ │ │──────────────────▶│ │ │ │ 2. 能力查询 │ │ │──────────────────▶│ │ │ 3. 返回工具列表 │ │ │◀──────────────────│ │ 4. LLM决策调用 │ │ │◀──────────────────│ │ │ 5. 执行工具 │ │ │──────────────────▶│──────────────────▶│ │ │ 6. 返回结果 │ │ │◀──────────────────│ │ 7. 响应用户 │ │ │◀──────────────────│ │
通信机制
MCP使用JSON-RPC 2.0作为通信协议,包含三种消息类型:
- Requests:客户端到服务器的请求,包含id、method、params
- Responses:对请求的响应,包含result或error
- Notifications:单向通知,不期望响应
消息格式示例:
// Request{ "jsonrpc": "2.0", "id": 1, "method": "tools/list", "params": {}}// Response{ "jsonrpc": "2.0", "id": 1, "result": { "tools": [ { "name": "add", "description": "Add two numbers", "inputSchema": { "type": "object", "properties": { "a": {"type": "integer"}, "b": {"type": "integer"} } } } ] }}
完整的通信流程:
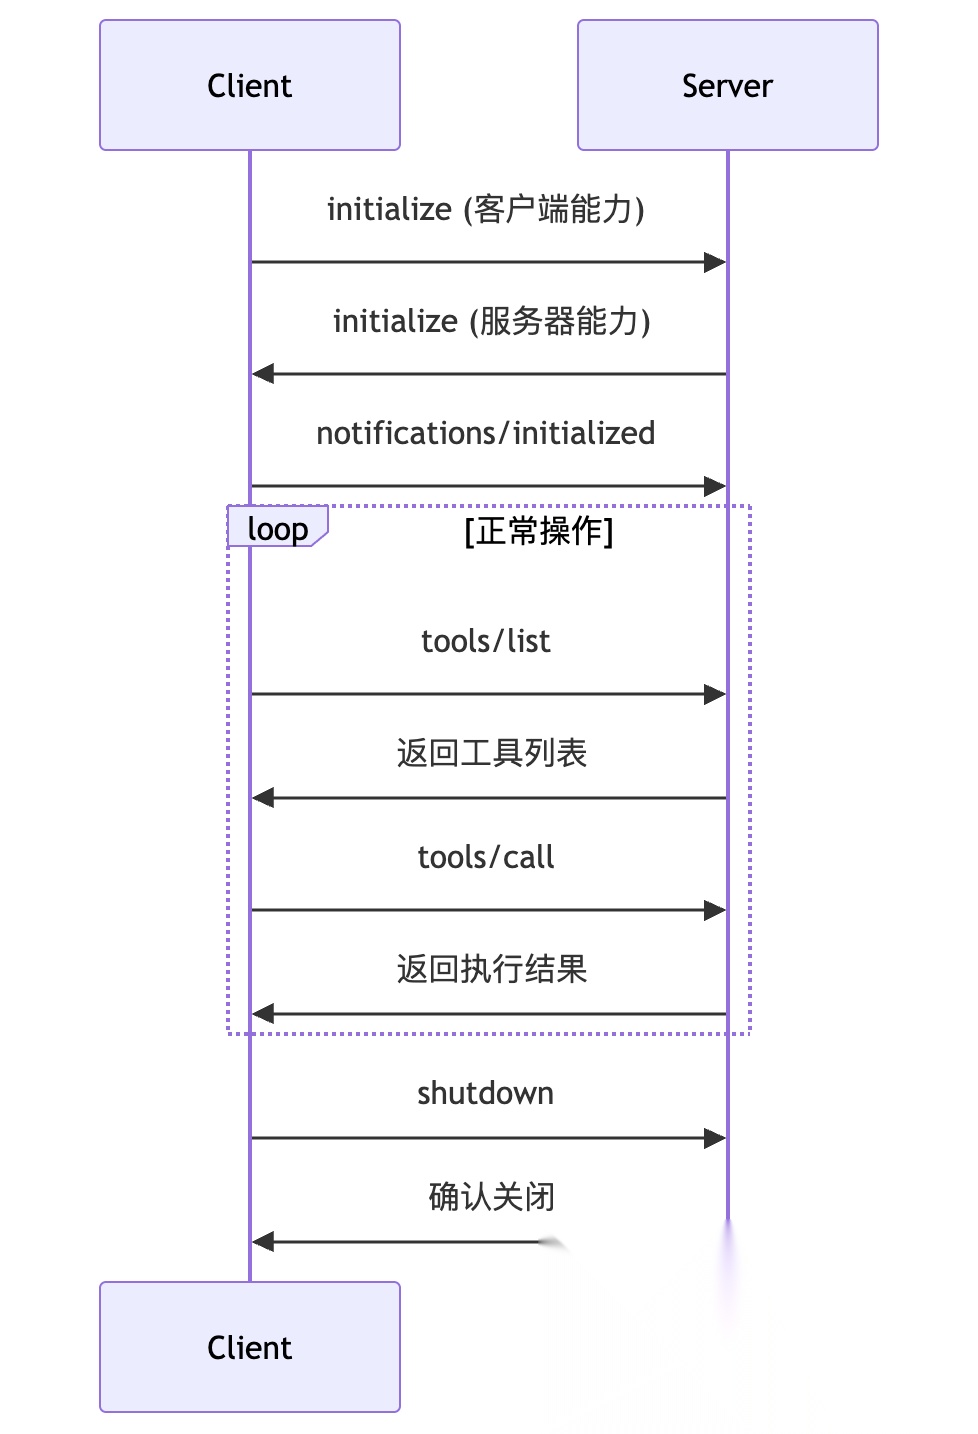
传输方式
MCP支持两种传输方式:
| 特性 | stdio | Streamable HTTP |
|---|---|---|
| 部署方式 | 本地子进程 | 远程服务 |
| 并发支持 | 单客户端 | 多客户端 |
| 安全性 | 进程隔离 | 需要认证授权 |
| 扩展性 | 有限 | 高 |
| 适用场景 | 开发测试 | 生产部署 |
| 网络要求 | 无 | 需要网络连接 |
| 延迟 | 低 | 取决于网络 |
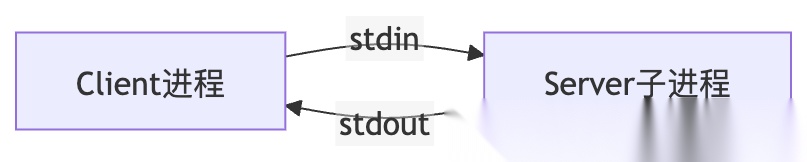
stdio传输详解:
-
客户端将MCP服务器作为子进程启动
-
服务器从stdin读取JSON-RPC消息
-
向stdout写入响应
-
适合本地开发和单用户桌面设置
Streamable HTTP传输详解:
-
服务器作为独立进程运行
-
处理多个客户端连接
-
使用HTTP POST和GET请求
-
可选SSE流式传输
-
适合远程部署和生产环境
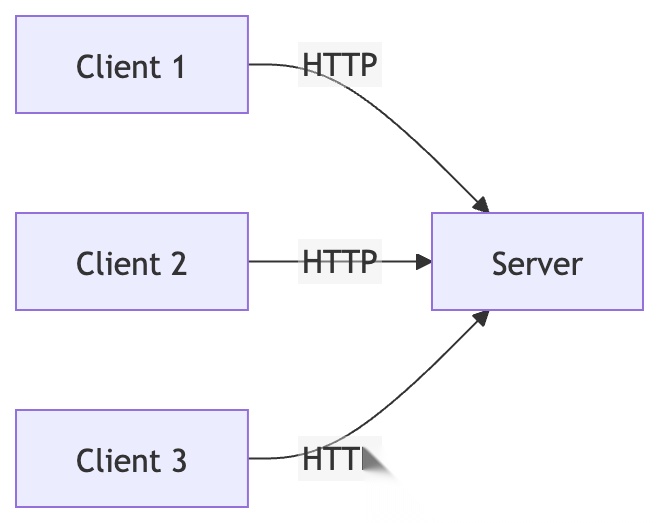
选择建议:
- 开发测试阶段:使用stdio,简单快捷
- 生产环境:使用Streamable HTTP,支持并发和扩展
- 本地部署:stdio为主,必要时可切换到HTTP
- 远程部署:必须使用Streamable HTTP
🎯 本章小结: MCP采用三层架构,使用JSON-RPC 2.0通信,支持stdio和HTTP两种传输方式。理解这些架构细节,能帮助你设计出更健壮的MCP Server。
三种原语详解
MCP定义了三种原语(Primitives),它们是Server向Client提供的核心能力。
Tools(工具)
定义:工具是AI应用可以调用以执行操作的可执行函数。
控制层级:模型控制(Model-controlled)
- AI模型决定何时调用工具
- 工具执行外部操作(如API调用、数据库查询)
代码示例:
@mcp.tool()def add(a: int, b: int) -> int: """Add two numbers.""" return a + b
特点:
- 可以执行任意代码
- 可以修改外部状态
- 需要适当的权限控制
- 应被视为不受信任,除非来自受信任的服务器
安全考虑:
- 工具应该有清晰的输入验证
- 敏感操作需要额外的确认机制
- 执行结果应该经过过滤,避免信息泄露
- 考虑添加速率限制,防止滥用
Resources(资源)
定义:资源是提供额外上下文给AI应用的数据源。
控制层级:应用控制(Application-controlled)
- 客户端应用决定如何和何时使用资源
- 资源通常是只读的
代码示例:
@mcp.resource("greeting://{name}")def greeting(name: str) -> str: """Greet someone by name.""" return f"Hello, {name}!"
资源类型:
- 文件内容
- 数据库记录
- API响应
- 实时系统数据
- 截图和图像
- 日志文件
URI格式:[protocol]://[host]/[path]
file:///home/user/documents/report.pdfpostgres://database/customers/schemascreen://localhost/display1
**资源订阅机制:**资源可以支持订阅,当资源内容变化时主动通知客户端。
@mcp.resource("logs://app", subscribe=True)def get_logs() -> str: """Get application logs.""" return "\n".join(log_entries)
Prompts(提示词)
定义:提示词是预定义的模板或指令,用于引导语言模型交互。
控制层级:用户控制(User-controlled)
- 用户通过UI元素(如斜杠命令、菜单选项)显式选择
- 提供结构化的消息和工作流
代码示例:
@mcp.prompt()def summarize(text: str) -> str: """Summarize a piece of text in one sentence.""" return f"Summarize the following text in one sentence:\n\n{text}"
特点:
- 可以接受动态参数
- 可以包含资源上下文
- 可以链接多个交互
- 指导特定任务
三种原语的区别
| 原语 | 控制方 | 用途 | 示例 | 适用场景 | 安全级别 |
|---|---|---|---|---|---|
| Tools | 模型 | 执行操作 | API调用、数据库写入 | 需要执行外部操作 | 高风险 |
| Resources | 应用 | 提供数据 | 文件内容、API响应 | 提供上下文信息 | 低风险 |
| Prompts | 用户 | 指导交互 | 系统提示、少样本示例 | 引导模型行为 | 中等风险 |
选择指南:
- 需要执行操作?用Tools
- 需要提供数据?用Resources
- 需要指导行为?用Prompts
- 三者可以同时存在一个服务器中
最佳实践:
- 最小权限原则:工具只授予必要的权限
- 输入验证:所有输入都应该验证和清理
- 输出过滤:敏感信息不应该暴露给模型
- 日志记录:所有操作都应该有审计日志
- 错误处理:优雅地处理错误,避免泄露系统信息
🎯 本章小结: MCP的三种原语各有分工——Tools执行操作,Resources提供数据,Prompts指导交互。掌握它们的区别和适用场景,能让你设计出更合理的MCP Server。
MCP Server构建详解
环境准备
首先,确保你已经安装了Python 3.10+和uv(推荐的包管理工具)。
# 安装uv(如果还没有)curl -LsSf https://astral.sh/uv/install.sh | sh# 创建项目目录mkdir mcp-server-projectcd mcp-server-project# 初始化项目uv init# 添加MCP依赖uv add "mcp[cli]"
基本结构
一个最小的MCP Server只需要几行代码:
# simple_server.pyfrom mcp.server import MCPServermcp = MCPServer("Demo")@mcp.tool()def add(a: int, b: int) -> int: """Add two numbers.""" return a + bif __name__ == "__main__": import asyncio from mcp.server.stdio import stdio_server async def main(): async with stdio_server() as streams: await mcp.run( streams[0], streams[1], mcp.create_initialization_options() ) asyncio.run(main())
Server生命周期管理
MCP Server的生命周期包括以下几个阶段:
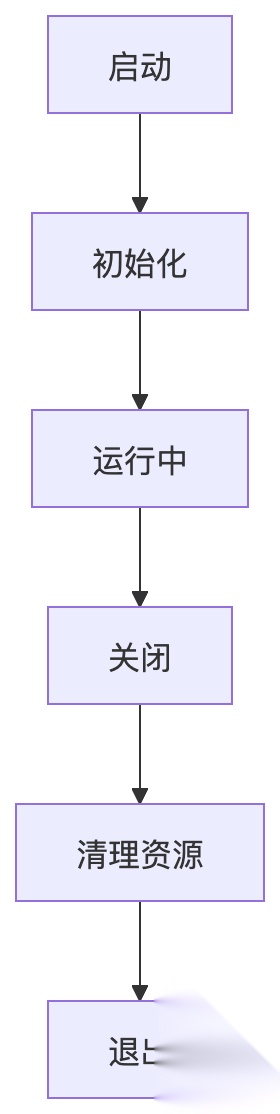
生命周期钩子:
from mcp.server import MCPServerfrom contextlib import asynccontextmanager@asynccontextmanagerasync def lifespan(server: MCPServer): """管理服务器生命周期""" # 启动时执行 print("服务器启动中...") await initialize_resources() yield # 服务器运行 # 关闭时执行 print("服务器关闭中...") await cleanup_resources()mcp = MCPServer("Demo", lifespan=lifespan)
最佳实践:
- 优雅关闭:确保在关闭时释放所有资源
- 错误恢复:实现重试机制和降级策略
- 健康检查:定期检查服务器状态
- 资源监控:监控内存、CPU使用情况
运行服务器
MCP提供了三种运行模式:
# 开发模式(带Inspector,推荐)uv run mcp dev server.py# 生产模式(stdio)uv run mcp run server.py# 生产模式(HTTP)uv run mcp run server.py --transport streamable-http
开发模式会启动一个Web界面,让你可以交互式地测试工具、资源和提示词。这是开发阶段最常用的方式。
工具定义与注册
MCP Python SDK支持两种定义工具的方式:
方式一:装饰器(推荐)
@mcp.tool()def calculate(expression: str) -> str: """Evaluate a mathematical expression. Args: expression: Mathematical expression to evaluate """ try: result = eval(expression) return str(result) except Exception as e: return f"Error: {str(e)}"
方式二:手动注册
from mcp.types import Toolserver.add_tool( Tool( name="calculate", description="Evaluate a mathematical expression", inputSchema={ "type": "object", "properties": { "expression": { "type": "string", "description": "Mathematical expression to evaluate" } }, "required": ["expression"] } ), handler=calculate_handler)
装饰器方式更简洁,会自动从函数签名和docstring生成输入模式。手动注册方式更灵活,适合需要精确控制Schema的场景。
错误处理
完善的错误处理是生产级MCP Server的关键。
from mcp.server import MCPServerfrom mcp.types import ToolErrormcp = MCPServer("Demo")@mcp.tool()async def risky_operation(data: str) -> str: """Operation that might fail.""" try: # 可能失败的操作 result = await perform_operation(data) return result except ValueError as e: # 业务逻辑错误 raise ToolError(f"Invalid input: {str(e)}") except ConnectionError as e: # 连接错误 raise ToolError(f"Service unavailable: {str(e)}") except Exception as e: # 未知错误 raise ToolError(f"Internal error: {str(e)}")
错误类型分类:
- ToolError:工具执行错误
- ValidationError:输入验证错误
- PermissionError:权限错误
- TimeoutError:超时错误
错误处理最佳实践:
- 提供有意义的错误信息:帮助用户理解问题
- 不要暴露内部细节:避免泄露系统信息
- 记录错误日志:便于调试和监控
- 实现重试机制:对于临时性错误
资源定义与注册
静态资源:
@mcp.resource("config://app")def get_config() -> str: """Get application configuration.""" return json.dumps({ "version": "1.0", "debug": False, "api_key": "hidden" })
动态资源模板:
@mcp.resource("users://{user_id}/profile")def get_user_profile(user_id: str) -> str: """Get user profile by ID.""" user = db.get_user(user_id) return json.dumps(user)
资源订阅:
@mcp.resource("logs://app", subscribe=True)def get_logs() -> str: """Get application logs.""" return "\n".join(log_entries)
提示词定义与注册
简单提示词:
@mcp.prompt()def code_review(code: str) -> str: """Generate a code review prompt.""" return f"""Please review the following code and provide feedback:```python{code}
Focus on:
- Code quality and readability
- Potential bugs or issues
- Performance improvements
- Security concerns"“”
**带参数的提示词:**```python@mcp.prompt()def debug_error(error_message: str, stack_trace: str = None) -> str: """Generate a debugging prompt for an error.""" prompt = f"Help me debug this error:\n\n{error_message}" if stack_trace: prompt += f"\n\nStack trace:\n{stack_trace}" prompt += "\n\nPlease provide:\n1. Root cause analysis\n2. Potential solutions\n3. Prevention measures" return prompt
🎯 本章小结: 使用Python SDK构建MCP Server非常简单。通过装饰器,你可以快速定义工具、资源和提示词。开发时使用mcp dev进行调试,生产环境选择stdio或HTTP传输。
完整项目实现
接下来,我们将构建两个完整的MCP Server项目:一个计算器服务器和一个用户数据服务器。这两个项目涵盖了MCP的三种原语,可以作为你开发实际项目的模板。
项目一:计算器MCP Server
这是一个功能完整的计算器服务器,包含基本的数学运算工具。
项目结构:
calculator-server/├── server.py├── requirements.txt└── README.md
requirements.txt:
mcp[cli]>=2.0.0
server.py:
# calculator-server/server.pyfrom mcp.server import MCPServerimport mathmcp = MCPServer("Calculator Server", version="1.0.0")@mcp.tool()def add(a: float, b: float) -> float: """Add two numbers. Args: a: First number b: Second number """ return a + b@mcp.tool()def subtract(a: float, b: float) -> float: """Subtract b from a. Args: a: Number to subtract from b: Number to subtract """ return a - b@mcp.tool()def multiply(a: float, b: float) -> float: """Multiply two numbers. Args: a: First number b: Second number """ return a * b@mcp.tool()def divide(a: float, b: float) -> float: """Divide a by b. Args: a: Dividend b: Divisor """ if b == 0: raise ValueError("Cannot divide by zero") return a / b@mcp.tool()def power(base: float, exponent: float) -> float: """Raise base to the power of exponent. Args: base: Base number exponent: Exponent """ return math.pow(base, exponent)@mcp.tool()def square_root(number: float) -> float: """Calculate the square root of a number. Args: number: Number to calculate square root of """ if number < 0: raise ValueError("Cannot calculate square root of negative number") return math.sqrt(number)@mcp.tool()def calculate_expression(expression: str) -> str: """Evaluate a mathematical expression safely. Args: expression: Mathematical expression to evaluate (e.g., "2 + 3 * 4") """ # 简单的安全检查 allowed_chars = set("0123456789+-*/.() ") if not all(c in allowed_chars for c in expression): return "Error: Expression contains invalid characters" try: # ⚠️ 安全警告:eval函数存在代码注入风险,仅用于演示 # 生产环境应使用安全的数学表达式解析库(如simpleeval) result = eval(expression, {"__builtins__": {}}, {"math": math}) return str(result) except Exception as e: return f"Error: {str(e)}"@mcp.resource("calculator://history")def get_history() -> str: """Get calculator operation history.""" # 这里可以连接实际的历史记录存储 return '{"history": ["2 + 3 = 5", "10 / 2 = 5"]}'@mcp.prompt()def math_tutor(operation: str) -> str: """Generate a math tutor prompt for a specific operation. Args: operation: The math operation to explain (e.g., "addition", "multiplication") """ return f"""You are a math tutor. Explain the concept of {operation} in simple terms.Please provide:1. A clear definition2. Real-world examples3. Common mistakes to avoid4. Practice problemsMake your explanation engaging and easy to understand."""if __name__ == "__main__": import asyncio from mcp.server.stdio import stdio_server async def main(): async with stdio_server() as streams: await mcp.run( streams[0], streams[1], mcp.create_initialization_options() ) asyncio.run(main())
运行和测试:
# 进入项目目录cd calculator-server# 开发模式运行uv run mcp dev server.py# 在浏览器中打开 http://localhost:3000 进行测试
测试示例:
# 使用MCP Inspector测试# 1. 打开 http://localhost:3000# 2. 在Tools标签页选择"add"# 3. 输入参数:{"a": 5, "b": 3}# 4. 点击"Run Tool"# 5. 查看返回结果:8
项目二:用户数据MCP Server
这是一个用户数据管理服务器,展示了如何处理更复杂的业务逻辑和数据操作。
项目结构:
user-data-server/├── server.py├── database.py├── requirements.txt└── .env
requirements.txt:
mcp[cli]>=2.0.0python-dotenv>=1.0.0httpx>=0.24.0
.env:
API_KEY=your-api-key-hereDATABASE_URL=sqlite:///users.db
database.py:
# user-data-server/database.pyimport sqlite3import jsonfrom typing import Optional, Dict, Listclass UserDatabase: def __init__(self, db_path: str = "users.db"): self.db_path = db_path self.init_db() def init_db(self): """Initialize the database with sample data.""" conn = sqlite3.connect(self.db_path) cursor = conn.cursor() # 创建用户表 cursor.execute(''' CREATE TABLE IF NOT EXISTS users ( id INTEGER PRIMARY KEY, name TEXT NOT NULL, email TEXT UNIQUE NOT NULL, department TEXT, created_at TIMESTAMP DEFAULT CURRENT_TIMESTAMP ) ''') # 插入示例数据 sample_users = [ (1, "Alice", "alice@example.com", "Engineering"), (2, "Bob", "bob@example.com", "Marketing"), (3, "Charlie", "charlie@example.com", "Design"), (4, "Diana", "diana@example.com", "Engineering"), (5, "Eve", "eve@example.com", "Product") ] cursor.executemany( "INSERT OR IGNORE INTO users (id, name, email, department) VALUES (?, ?, ?, ?)", sample_users ) conn.commit() conn.close() def get_user(self, user_id: int) -> Optional[Dict]: """Get user by ID.""" conn = sqlite3.connect(self.db_path) cursor = conn.cursor() cursor.execute("SELECT * FROM users WHERE id = ?", (user_id,)) row = cursor.fetchone() conn.close() if row: return { "id": row[0], "name": row[1], "email": row[2], "department": row[3], "created_at": row[4] } return None def list_users(self) -> List[Dict]: """List all users.""" conn = sqlite3.connect(self.db_path) cursor = conn.cursor() cursor.execute("SELECT * FROM users") rows = cursor.fetchall() conn.close() return [ { "id": row[0], "name": row[1], "email": row[2], "department": row[3], "created_at": row[4] } for row in rows ] def create_user(self, name: str, email: str, department: str) -> Dict: """Create a new user.""" conn = sqlite3.connect(self.db_path) cursor = conn.cursor() try: cursor.execute( "INSERT INTO users (name, email, department) VALUES (?, ?, ?)", (name, email, department) ) user_id = cursor.lastrowid conn.commit() return { "id": user_id, "name": name, "email": email, "department": department } except sqlite3.IntegrityError: raise ValueError(f"User with email {email} already exists") finally: conn.close() def update_user(self, user_id: int, **kwargs) -> Optional[Dict]: """Update user information.""" conn = sqlite3.connect(self.db_path) cursor = conn.cursor() # 构建更新语句 updates = [] values = [] for key, value in kwargs.items(): if key in ["name", "email", "department"]: updates.append(f"{key} = ?") values.append(value) if not updates: return self.get_user(user_id) values.append(user_id) query = f"UPDATE users SET {', '.join(updates)} WHERE id = ?" cursor.execute(query, values) conn.commit() conn.close() return self.get_user(user_id) def delete_user(self, user_id: int) -> bool: """Delete a user.""" conn = sqlite3.connect(self.db_path) cursor = conn.cursor() cursor.execute("DELETE FROM users WHERE id = ?", (user_id,)) deleted = cursor.rowcount > 0 conn.commit() conn.close() return deleted
server.py:
# user-data-server/server.pyfrom mcp.server import MCPServerfrom dotenv import load_dotenvimport osimport jsonfrom database import UserDatabase# 加载环境变量load_dotenv()# 创建服务器实例mcp = MCPServer("User Data Server", version="1.0.0")# 初始化数据库db = UserDatabase()# 工具定义@mcp.tool()def get_user(user_id: int) -> str: """Get user information by ID. Args: user_id: The ID of the user to retrieve """ user = db.get_user(user_id) if user: return json.dumps(user, indent=2) raise ValueError(f"User with ID {user_id} not found")@mcp.tool()def create_user(name: str, email: str, department: str) -> str: """Create a new user. Args: name: User's full name email: User's email address department: User's department """ try: user = db.create_user(name, email, department) return json.dumps(user, indent=2) except ValueError as e: return f"Error: {str(e)}"@mcp.tool()def update_user(user_id: int, name: str = None, email: str = None, department: str = None) -> str: """Update user information. Args: user_id: The ID of the user to update name: New name (optional) email: New email (optional) department: New department (optional) """ updates = {} if name: updates["name"] = name if email: updates["email"] = email if department: updates["department"] = department if not updates: return "Error: No fields to update" user = db.update_user(user_id, **updates) if user: return json.dumps(user, indent=2) raise ValueError(f"User with ID {user_id} not found")@mcp.tool()def delete_user(user_id: int) -> str: """Delete a user by ID. Args: user_id: The ID of the user to delete """ if db.delete_user(user_id): return f"User with ID {user_id} deleted successfully" raise ValueError(f"User with ID {user_id} not found")# 资源定义@mcp.resource("users://list")def list_users() -> str: """Get list of all users.""" users = db.list_users() return json.dumps(users, indent=2)@mcp.resource("users://{user_id}/profile")def user_profile(user_id: int) -> str: """Get user profile by ID.""" user = db.get_user(user_id) if user: return json.dumps(user, indent=2) raise ValueError(f"User with ID {user_id} not found")@mcp.resource("config://app")def app_config() -> str: """Get application configuration.""" config = { "version": "1.0.0", "environment": os.getenv("ENVIRONMENT", "development"), "api_key": "***hidden***", "database": "SQLite", "debug": os.getenv("DEBUG", "false").lower() == "true" } return json.dumps(config, indent=2)@mcp.resource("stats://users", subscribe=True)def user_stats() -> str: """Get user statistics.""" users = db.list_users() departments = {} for user in users: dept = user.get("department", "Unknown") departments[dept] = departments.get(dept, 0) + 1 stats = { "total_users": len(users), "departments": departments, "last_updated": "2026-09-15T10:00:00Z" } return json.dumps(stats, indent=2)# 提示词定义@mcp.prompt()def user_report(user_id: int) -> str: """Generate a user report prompt. Args: user_id: The ID of the user to report on """ user = db.get_user(user_id) if not user: return f"User with ID {user_id} not found" return f"""Generate a comprehensive report for user:Name: {user['name']}Email: {user['email']}Department: {user['department']}Created: {user['created_at']}Please include:1. User overview2. Department context3. Activity summary4. RecommendationsFormat the report in a professional manner."""@mcp.prompt()def department_analysis(department: str) -> str: """Generate a department analysis prompt. Args: department: The department to analyze """ users = db.list_users() dept_users = [u for u in users if u.get("department") == department] return f"""Analyze the {department} department:Current members ({len(dept_users)}):{chr(10).join([f"- {u['name']} ({u['email']})" for u in dept_users])}Please provide:1. Team composition analysis2. Strengths and gaps3. Recommendations for improvement4. Growth opportunitiesFocus on actionable insights."""if __name__ == "__main__": import asyncio from mcp.server.stdio import stdio_server async def main(): async with stdio_server() as streams: await mcp.run( streams[0], streams[1], mcp.create_initialization_options() ) asyncio.run(main())
运行和测试:
# 进入项目目录cd user-data-server# 安装依赖uv add "mcp[cli]" python-dotenv httpx# 开发模式运行uv run mcp dev server.py# 在浏览器中测试各个工具和资源
🎯 本章小结: 通过这两个项目,你已经掌握了构建MCP Server的完整流程。第一个项目展示了基础工具的实现,第二个项目展示了更复杂的业务逻辑、数据库操作和资源管理。这些代码可以直接复用到你的实际项目中。
主流客户端集成
构建好MCP Server后,下一步就是将它集成到各种AI客户端中。以下是主流客户端的配置方法。
Claude Desktop
配置文件位置:
- macOS:
~/Library/Application Support/Claude/claude_desktop_config.json - Windows:
%APPDATA%\Claude\claude_desktop_config.json
配置示例:
{ "mcpServers": { "calculator": { "command": "python", "args": ["/path/to/calculator-server/server.py"], "env": {} }, "user-data": { "command": "python", "args": ["/path/to/user-data-server/server.py"], "env": { "API_KEY": "your-api-key" } } }}
VS Code
配置文件位置:
- 工作区:
.vscode/mcp.json - 用户:
~/Library/Application Support/Code/User/mcp.json
配置示例:
{ "servers": { "my-calculator": { "command": "python", "args": ["/path/to/calculator-server/server.py"], "env": {} } }}
Cursor
配置文件位置:~/.cursor/mcp.json
配置示例:
{ "mcpServers": { "calculator": { "command": "python", "args": ["/path/to/calculator-server/server.py"] } }}
其他支持MCP的客户端
| 客户端 | 配置文件位置 | 支持状态 |
|---|---|---|
| Claude Desktop | ~/Library/Application Support/Claude/claude_desktop_config.json | 原生支持 |
| VS Code | .vscode/mcp.json | 原生支持 |
| Cursor | ~/.cursor/mcp.json | 原生支持 |
| Windsurf | ~/.codeium/windsurf/mcp_config.json | 原生支持 |
| ChatGPT | 设置 > 连接器 | 远程MCP服务器 |
| Zed | ~/.config/zed/settings.json | 原生支持 |
| Gemini CLI | ~/.gemini/settings.json | 原生支持 |
🎯 本章小结: MCP Server的集成非常简单,只需在客户端配置文件中指定服务器命令即可。一次构建的MCP Server可以在所有支持MCP的客户端中使用,这正是MCP"一次构建,处处使用"理念的体现。
生产实践
将MCP Server从开发环境部署到生产环境,需要考虑更多因素。
部署方案
本地部署:
# 开发环境uv run mcp dev server.py# 生产环境(stdio)uv run mcp run server.py
远程部署:
# HTTP模式uv run mcp run server.py --transport streamable-http# Docker部署docker run -p 8000:8000 my-mcp-server
云部署选项:
| 平台 | 优势 | 适用场景 |
|---|---|---|
| AWS Lambda | 无服务器、自动扩展 | 事件驱动、低流量 |
| Google Cloud Run | 容器化、自动扩展 | Web服务、API |
| Azure Container Instances | 简单部署、按需付费 | 快速原型、测试 |
| Kubernetes | 高可用、复杂编排 | 企业级、大规模 |
安全性考虑
认证与授权:
# OAuth2配置示例mcp_config = { "auth": { "enabled": True, "type": "oauth2", "issuer": "https://auth.example.com", "client_id": "your-client-id", "client_secret": "your-client-secret" }}
网络安全:
- TLS加密:使用HTTPS加密通信
- 网络隔离:绑定到特定IP(如127.0.0.1)
- 防火墙:限制访问IP范围
- 速率限制:防止DDoS攻击
数据安全:
- 输入验证:验证所有输入参数
- 输出过滤:过滤敏感信息
- 日志脱敏:记录日志时隐藏敏感数据
- 审计跟踪:记录所有操作
性能优化
连接池管理:
# 数据库连接池配置db_config = { "pool_size": 10, "max_overflow": 20, "pool_timeout": 30, "pool_recycle": 1800}
缓存策略:
- 结果缓存:缓存工具执行结果
- 资源缓存:缓存资源读取结果
- 元数据缓存:缓存工具和资源列表
异步处理:
# 异步工具执行@mcp.tool()async def async_operation(data: str) -> str: """Asynchronous operation.""" result = await perform_async_task(data) return result
监控指标:
- 请求响应时间
- 错误率
- 并发连接数
- 资源使用率
可观测性
日志记录:
import logginglogging.basicConfig( level=logging.INFO, format='%(asctime)s - %(name)s - %(levelname)s - %(message)s')logger = logging.getLogger(__name__)@mcp.tool()def logged_operation(data: str) -> str: """Operation with logging.""" logger.info(f"Starting operation with data: {data}") try: result = process_data(data) logger.info(f"Operation completed successfully") return result except Exception as e: logger.error(f"Operation failed: {str(e)}") raise
健康检查:
@mcp.resource("health://check")def health_check() -> str: """Health check endpoint.""" return json.dumps({ "status": "healthy", "timestamp": datetime.now().isoformat(), "version": "1.0.0" })
🎯 本章小结: 生产环境部署MCP Server需要考虑安全性、性能和可观测性。通过合理的架构设计和监控,可以确保你的MCP Server稳定可靠地运行。
面试准备
掌握MCP不仅能提升你的开发能力,还能在面试中展示你对AI Agent架构的深入理解。
MCP是什么?答题模板
**基础回答:**MCP(Model Context Protocol)是Anthropic在2024年11月发布的一个开源标准,用于连接AI应用与外部系统。它就像AI应用的USB-C接口,提供了一种标准化的方式来连接AI模型与不同的数据源和工具。
**深入回答:**MCP解决了AI工具集成碎片化的问题。在MCP出现之前,每个AI应用需要为每个数据源开发自己的集成方案,导致开发复杂、难以扩展。MCP通过提供统一的协议标准,实现了"一次构建,处处使用"。
架构要点:
- 三层架构:Host(宿主)、Client(客户端)、Server(服务器)
- 三种原语:Tools(工具)、Resources(资源)、Prompts(提示词)
- 通信协议:基于JSON-RPC 2.0
- 传输方式:stdio(本地)和Streamable HTTP(远程)
技术细节:
- Tools:模型控制的可执行函数,用于执行外部操作
- Resources:应用控制的数据源,提供只读上下文
- Prompts:用户控制的模板,指导模型交互行为
应用场景:
- 连接数据库、API、文件系统等外部资源
- 构建可复用的工具生态系统
- 实现跨平台的AI工具集成
Server/Client通信原理的深入回答
通信流程:
- 连接建立:Client启动连接(stdio子进程或HTTP请求)
- 初始化握手:发送
initialize请求,包含客户端能力 - 能力协商:服务器响应其支持的能力(工具、资源、提示词)
- 正常操作:根据需要发送请求/接收响应
- 关闭连接:优雅终止连接
消息格式:
- Request:包含id、method、params
- Response:包含id、result或error
- Notification:单向通知,无id
传输机制:
- stdio:通过标准输入/输出流通信,适合本地部署
- Streamable HTTP:通过HTTP POST/GET通信,支持SSE流式传输,适合远程部署
安全性考虑:
- 用户同意和控制
- 工具行为描述应被视为不受信任
- 服务器不应看到完整的提示词
- 实施最小权限原则
常见问题与解决方案
**Q1:MCP与Function Calling有什么区别?**A:Function Calling是LLM提供商的内置功能,工具定义嵌入在API请求中。MCP是独立的协议标准,将工具外化为可共享的服务。Function Calling是模型级能力,MCP是应用级协议。
**Q2:如何选择stdio和Streamable HTTP?**A:stdio适合本地开发和单用户场景,简单安全。Streamable HTTP适合远程部署、多用户环境和生产场景,支持并发和扩展。
**Q3:MCP Server如何保证安全性?**A:1)实施认证和授权;2)使用最小权限原则;3)对工具执行进行沙箱隔离;4)监控和日志记录;5)定期安全审计。
**Q4:如何调试MCP Server?**A:1)使用MCP Inspector进行交互式测试;2)查看服务器日志;3)使用mcp dev命令进行开发调试;4)检查JSON-RPC消息格式。
**Q5:MCP Server如何扩展?**A:1)模块化设计,将工具、资源、提示词分离;2)使用装饰器简化注册;3)支持动态发现;4)实现健康检查和监控。
🎯 本章小结: 准备面试时,不仅要记住MCP的定义,还要理解它的架构设计和解决的问题。通过实际项目经验,你能更自信地回答相关问题。
学AI大模型的正确顺序,千万不要搞错了
🤔2026年AI风口已来!各行各业的AI渗透肉眼可见,超多公司要么转型做AI相关产品,要么高薪挖AI技术人才,机遇直接摆在眼前!
有往AI方向发展,或者本身有后端编程基础的朋友,直接冲AI大模型应用开发转岗超合适!
就算暂时不打算转岗,了解大模型、RAG、Prompt、Agent这些热门概念,能上手做简单项目,也绝对是求职加分王🔋
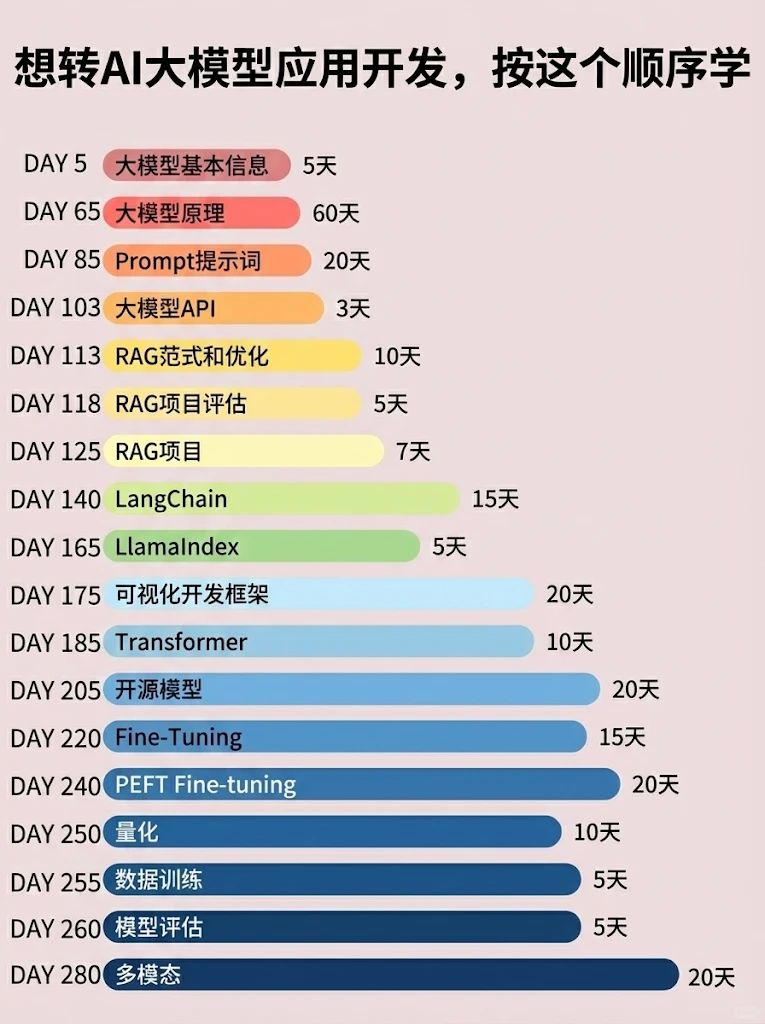
📝给大家整理了超全最新的AI大模型应用开发学习清单和资料,手把手帮你快速入门!👇👇
学习路线:
✅大模型基础认知—大模型核心原理、发展历程、主流模型(GPT、文心一言等)特点解析
✅核心技术模块—RAG检索增强生成、Prompt工程实战、Agent智能体开发逻辑
✅开发基础能力—Python进阶、API接口调用、大模型开发框架(LangChain等)实操
✅应用场景开发—智能问答系统、企业知识库、AIGC内容生成工具、行业定制化大模型应用
✅项目落地流程—需求拆解、技术选型、模型调优、测试上线、运维迭代
✅面试求职冲刺—岗位JD解析、简历AI项目包装、高频面试题汇总、模拟面经
以上6大模块,看似清晰好上手,实则每个部分都有扎实的核心内容需要吃透!
我把大模型的学习全流程已经整理📚好了!抓住AI时代风口,轻松解锁职业新可能,希望大家都能把握机遇,实现薪资/职业跃迁~
这份完整版的大模型 AI 学习资料已经上传CSDN,朋友们如果需要可以微信扫描下方CSDN官方认证二维码免费领取【保证100%免费】


AtomGit AI 社区提供模型库、数据集、Agent、Token等资源
更多推荐
 0
0 0
0- 0


 已为社区贡献7条内容

所有评论(0)